Getting started with the Step AI Agent in Step Studio
Step Studio is part of the Step CLI. It opens in your browser and runs on your own computer. Follow these steps to install the CLI and create your first test with AI. No Step instance is needed for this.
1. Get access and install the prerequisites
- Java 21 or later: a Java Runtime Environment (JRE) is sufficient; a JDK also works. On Linux, prefer your OS package manager. OpenJDK distributions such as Azul Zulu and Eclipse Temurin are suitable.
- Node.js 24 or later: download Node.js and install it on your computer.
- Enterprise downloads access: use your Step Enterprise Credentials, or request access if you do not have them.
- A Studio license with AI enabled: contact us if you need one.
- An Anthropic API key: obtain a key scoped to an Anthropic workspace from your organization’s administrator or the Anthropic Console.
2. Download the CLI and the AI Agent
Create a folder called Step in your home folder. Save both downloads below in it:
Step CLI 3.31.0 — includes Studio (Enterprise edition):
| Operating system | Enterprise |
|---|---|
| Windows | Download step.exe |
| macOS | Download step |
| Linux |
The Step AI Agent: download the AI Agent package (.jar). Save it in the same Step folder without renaming it. Its filename follows the pattern step-ai-agents-VERSION.jar, where VERSION is the version in the downloaded filename.
Copy your Studio license file directly into your home directory as step-studio-license.dat, one level above the Step folder:
| Operating system | Home directory (license) |
|---|---|
| Windows | C:\Users\your-name |
| macOS | /Users/your-name |
| Linux | /home/your-name |
3. Set the environment variables and start Studio
An environment variable is an operating-system setting passed to programs you start. Studio needs two: the location of the AI Agent file and your Anthropic API key.
Open PowerShell on Windows, or Terminal on macOS/Linux. Before running the commands for your operating system, replace VERSION with the version in your downloaded JAR filename and YOUR_ANTHROPIC_API_KEY with your own key. $HOME means your home folder; keep that part as written.
Windows — PowerShell:
$env:PATH = "$HOME\Step;" + $env:PATH
$env:STEP_STUDIO_AI_AGENT_PACKAGE = "$HOME\Step\step-ai-agents-VERSION.jar"
$env:ANTHROPIC_API_KEY = "YOUR_ANTHROPIC_API_KEY"
step studio
macOS/Linux — Terminal (Bash or Zsh):
chmod +x "$HOME/Step/step"
export PATH="$HOME/Step:$PATH"
export STEP_STUDIO_AI_AGENT_PACKAGE="$HOME/Step/step-ai-agents-VERSION.jar"
export ANTHROPIC_API_KEY="YOUR_ANTHROPIC_API_KEY"
step studio
These settings apply to this PowerShell or Terminal session. Set them before starting Studio, and launch Studio from that same window. If Studio is already running, stop it and restart it after setting the variables. Repeat the commands when starting from a new terminal window.
Studio opens at http://localhost:8080. Keep the terminal window open while using it. To stop Studio, type q in that window.
4. Create your first test
- In Studio, click New package, choose a name and a folder, and create the package.
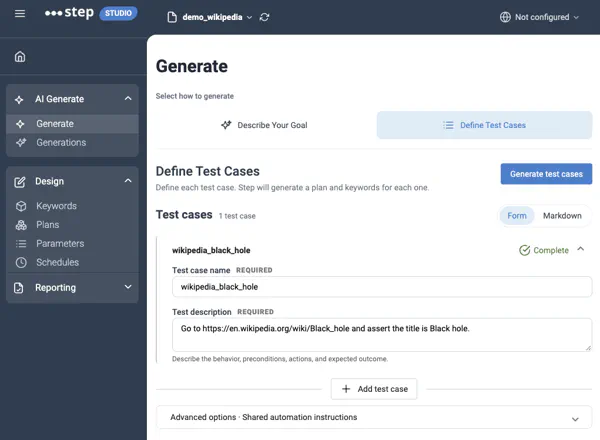
- Open AI Generate → Generate, then select Define Test Cases.
- Enter Test case name:
wikipedia_black_hole. - Enter Test description:
Go to https://en.wikipedia.org/wiki/Black_hole and check that the main heading reads Black hole. - Click Generate test cases. The AI Agent creates and runs the automation in your open package. Allow several minutes and follow the run under Generations.
Next: follow the Studio AI tutorial to create a complete checkout test and read its results. The Studio documentation covers the other editor features.
See Troubleshooting for common execution errors, and Data and privacy for model data handling.