Keyword API
A keyword represent your automation code, it can fully automate your workflow or a piece of it that you will pipe to other keywords in the end. To make its execution dynamic you can pass inputs to it; you can as well set its output and status for reporting and integrate it to more complex flows.
Resources
In addition to below documentation, you will find tutorials on the documentation pages as well as examples on github:
- Examples:
- Main classes in javadocs related to Keyword:
- Tutorials:
- Browse our tutorials provided for different automation framework and use cases
Keyword declaration
In order to communicate with Step, the class extends the AbstractKeyword superclass. Each method defining a keyword will have to be annotated with the annotation Keyword, will use no arguments and will be of return type void. More details about this class can be found in the javadoc.
public class MyKeywords extends AbstractKeyword{
  @Keyword
  public void myKeyword() {
    //my automation
  }
}
In order to communicate with Step, the class extends the AbstractScript superclass. Each method defining a keyword will have to be annotated with the annotation Keyword, will use no arguments and will be of return type void.
namespace STEP {
  public class Keywords : StepApi.AbstractScript {
    [Keyword(name = "My Keyword")]
    public void MyKeyword() {
      //your implementation
    }
  }
}
Javascript Keyword definition being asynchronous, you must end your keyword with an output.send call.
exports.MyKeyword = async (input, output, session, properties) => {
  //do some work
  output.send({ result: 'OK' })
}
Keyword annotation
The Keyword annotation as following optional attributes which can be used:
- name: the name of this keyword. If not specified the method name is used as keyword name
- description: a text describing the keyword usage. It will be displayed in the gui
- properties: the list of properties required by this keyword
- optionalProperties: the list of optional properties which might be used by this keyword
- schema: the JSON schema of the input object
- timeout: the keyword timeout in milliseconds
- planReference: the path to the file containing a plain text plan; used to define a composite keyword
More details on the usage and impact of these attributes are described here.
Keyword inputs
A Keyword’s input is a JsonObject with opened types. Thus the developer can choose the type of their arguments but must ensure that they are read accordingly to that type, otherwise the Json reader will throw an error.
The inputs are passed to the keyword by the caller as described in the following sections.
Reading the inputs in code
Inside the Keyword, you can then retrieve your inputs like this:
String homeUrl = input.getString("url");
int elementIndex = input.getInt("index",1);
String homeUrl = (string)input["url"];var homeUrl = input['url'];Reading inputs from method arguments
For Java there is also the alternative way to define and read inputs in Keyword.
As mentioned above, the @Keyword annotation supports the schema parameter to specify the format of inputs. Instead of this, you can define the @Input parameters in keyword method explicity.
The @Input annotation supports the following attriubtes:
- name: the name of input (must be defined for method parameter)
- defaultValue - the default value to be used if the input is not defined when calling the keyword
- required - if true, the value of this input must be defined (
falseby default)
You can annotate the following method arguments with @Input:
- String
- Integer (or int)
- Long (or long)
- Double (or double)
- BigDecimal
- BigInteger
- Array or Collection with any of supported types
- Your own java class with any nested fields (you can also annotate nested fields with
@Inputannotation, if you wand to apply the defaultValue or required configuration to this field)
If you use the @Input annotation on keyword parameters, you will also have input values automatically bound to this parameters and thus you can easily read this values.
Some examples explaining how to the @Input annotation:
public class KeywordTestClass extends AbstractKeyword {
  @Keyword
  public void MyKeywordWithInputAnnotation(
    @Input(name = "numberField", defaultValue = "1", required = true) Integer numberField,
    @Input(name = "booleanField", defaultValue = "true", required = true) Boolean booleanField,
    @Input(name = "stringField", defaultValue = "myValue", required = true) String stringField
    ) {
    ...
  }
  @Keyword
  public void MyKeywordWithInputNestedFieldAnnotation(
    @Input(name = "propertyWithNestedFields") ClassWithNestedFields classWithNestedFields
    ) {
    ...
  }
  @Keyword
  public void MyKeywordWithInputArrays(
    @Input(name = "stringArray", defaultValue = "a;b;c", required = true) String[] stringArray,
    @Input(name = "integerArray", defaultValue = "1;2;3") Integer[] integerArray,
    @Input(name = "stringList", defaultValue = "c;d;e") List<String> stringList
    ) {
    ...
  }
}
public class ClassWithNestedFields {
  @Input(defaultValue = "nestedValue1", required = true)
  private String nestedStringProperty;
  // you can omit the @Input annotation for field, if you don't need to specify the default value or 'required' for it
  private Integer nestedNumberProperty;
  ...
}
Passing inputs from code
When calling the keyword from your code (for instance in JUnit), you can pass the input as parameter:
ExecutionContext ctx = KeywordRunner.getExecutionContext(properties, this.getClass());
// { "url" : "http://step.exense.ch", "index" : 3 }
Output<JsonObject> output = ctx.run("MyKeyword", "{\"url\":\"http://www.exense.ch\", \"index\" : 3 }");
Passing inputs from the Step plan
When calling the Keyword from a plan, you can pass the input as parameter as shown in below screenshots. More details can be found in the dedicated documentation for Plans:
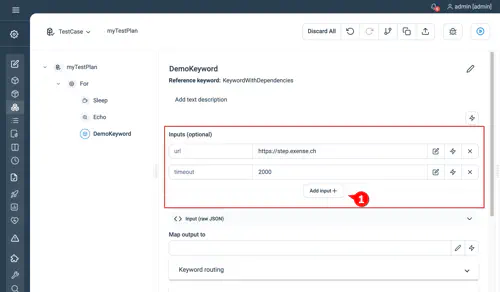
If the Keyword has an attached schema required and optional inputs can be defined
Keyword properties
Keywords can also access a map of properties which contains all variables in the scope of execution. This includes variables defined:
- In the properties of the agent executing the keyword
- In the plan calling the keyword using “Set”
- In the parameters defined in the controller
- In the Keyword configuration such as:
- $keywordName: the name of the keyword
- $keywordTimeout: the defined execution timeout of this keyword
You can retrieve the properties in your keywords from the properties map
properties.get("myVar");properties["myVar"]properties['myVar']Keyword outputs
Each keyword can define the content of its output by using the herited “output” object from its parent class. This output builder object is mainly used to:
- add any key/value pair information for example:
- for functional checks in plan
- required for workflow execution
- set keyword execution status
- add attachments (pdf, screenshots, exception stack trace as text file…)
- define custom response time measurements for analytics
The method of the OutputBuilder class can be found in the javadoc. The same methods are available for .net. For node.js, you may refer to the source code on github.
Custom fields
Below are example on how to add key/value pair information to your keyword’s output object.
You can refer to the javadoc for the full list of available method. Below is an example for adding a field with a String value:
output.add("field_name", "field_value");output.add("field_name", "field_value");output.add("field_name","field_value")Attachment
Below is an example for attaching files to the Keyword’s output:
byte[] bytes = Files.readAllBytes(file.toPath());
Attachment attachment = AttachmentHelper.generateAttachmentFromByteArray(bytes, outputName+".log");
output.addAttachment(attachment);
Attachment a = AttachmentBuilder.generateAttachmentForException(exception);
output.addAttachment(a);output.attach({ name: 'screenshot.png', hexContent: data })Measurements
Measurements are automatically created by the controller when executing a keyword. This represents the keyword execution time from the controller view (but excluding any delegation time to the agents). You can create custom response time measurements inside your keyword to have finer granularity and/or to enrich the measurements with any key/value pair for analytics purposes.
Refer to the OutputBuilder class’s javadoc for all available methods.
Example:
output.startMeasure("CustomMeasureInKeyword");
//Do some automation work
output.startMeasure("CustomMeasureInKeyword_Inner");
//Do some further work to be measured with finer granularity
output.stopMeasure();//this stop the lasted opened measurement: "CustomMeasureInKeyword_Inner"
//Add some values to the measurement for analytics and close the measurement "CustomMeasureInKeyword"
Map<String,String> measurementData = new HashMap<String,String>();
measurementData.put("username","Smith");
output.stopMeasure(measurementData); output.startMeasure("Navigate");
//do something
output.stopMeasure();Measurement API is currently not available in node.jsError handling
Step makes a difference between errors which are internal (status “TECHNICAL_ERROR”) and business errors (status “FAILED”). Any unhandled exception raised during the execution of a keyword will end up in the status “TECHNICAL_ERROR”. In order to produce clean reports and leverage this distinction, we highly recommend catching any exception being thrown from within your keywords and handle the situation adequately.
Technical Errors
In case your still want your keyword to end up in a technical error state, you may use one of the setError methods available in all supported languages. Likewise, any exception which is thrown from the Keyword will result in a technical error. Remember that this is not the preferred approach as internal error should be reserved for Step technical errors.
Business errors
To manage properly any errors related to the system or application which is being automated, you may use the setBusinessError method. This will automatically set the status of the keyword execution to “FAILED”.
If the status as to be determined outside of the keyword, add any meaningful values to the output and perform the check in the caller (i.e. in a Step plan).
In case of exception, you can attach the detailed information to the output object such as the exception message. You can even attach binary content or the exception stack trace to the object by doing so:
output.add("ExceptionMessage",e.getMessage());
output.addAttachment(AttachmentHelper.generateAttachmentForException(e));
Attachment a = AttachmentBuilder.generateAttachmentForException(exception);
output.addAttachment(a);output.attach({ name: 'exception.log', hexContent: data })onError hook
For each language, overriding the onError hook offers a last chance to manage unhandled exceptions. Each time your keyword function throws an exception, this function will be called with the exception as argument. The return value of this function determine if the exception should be re-thrown (return true) or ignored (return false):
- If re-thrown, the status of the execution will be reported as a “TECHNICAL_ERROR” and an attachment of the exception trace will be added
- If ignored, the status will be set as “PASSED” and no error will be reported
Overriding this function is done as follow:
@Override
public boolean onError(Exception e) {
  /* do here cleanup or exception reporting */
  return false;
}
public override bool onError(Exception e)
{
/* do here cleanup or exception reporting */
return false;
}exports.onError = async (exception, input, output, session, properties) => {
/* do here cleanup or exception reporting */
return false;
}beforeKeyword and afterKeyword hooks
For each language, overriding the beforeKeyword or afterKeyword hooks allow you to execute management code before or after a keyword is called. Note that the afterKeyword function will always be called, even if an exception occurs during the keyword execution or during the beforeKeyword call. The onError call is called before the afterKeyword in case of exception.
Overriding these functions is done as follow:
@Override
public void beforeKeyword(String keywordName, Keyword annotation) {
  /* do here some management */
  System.out.println("Calling "+keywordName);
}
@Override
public void afterKeyword(String keywordName, Keyword annotation) {
  /* do here some management */
  takeScreenshot();
}
public override void BeforeKeyword(string KeywordName, Keyword Annotation)
{
/* do here some management */
Console.WriteLine("Calling "+keywordName);
}
public override void AfterKeyword(string KeywordName, Keyword Annotation)
{
/* do here some management */
TakeScreenshot();
}Not available for the node js agent
Session
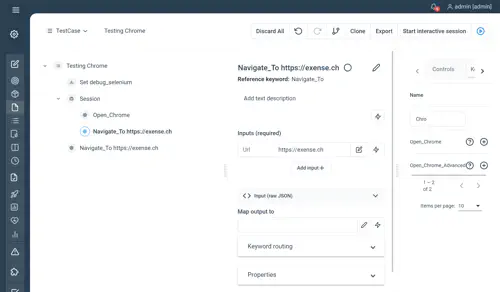
Step provides the ability to store data in a session object. This object usually only makes sense when a Session control is used inside the test plan. The session object becomes very useful when passing information or technical objects between keywords (see for example the way we use Selenium’s driver in the next section), especially if the data is difficult or impossible to serialize and de-serialize via the input/output mechanism.
Storing and accessing objects
Storing by name
You can set any kind of data (primitive types or collections) in the session object as follow :
@Keyword(name="PutToSession")
public void putToSession(){
  session.put("string_key", "Here is my value");
  session.put("int_key", 3);
}session.put("driver", new Wrapper(driver));session.driver_wrapper = createdDriver_wrapperYou can then access your data from another keyword the same way, but you’ll have to cast the data manually back to its original type :
@Keyword(name="GetFromSession")
public void getFromSession() {
  output.add("my_string_value", (String) session.get("string_key"));
  output.add("my_int_value", (int) session.get("int_key"));
}
Wrapper wrapper = (Wrapper)session.get("driver");const driver = session.driver_wrapper.driverIf you’re using a collection, see the method Arrays.copyOf to convert all of its content at once back to the original type.
You can then create a test plan using the “Session” control in order to pass the session information trough different Keywords. Note that we also included a keyword outside a session to see what’s append when no session exist but the keyword try to access it anyway:
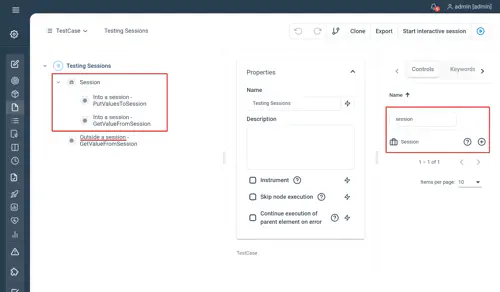
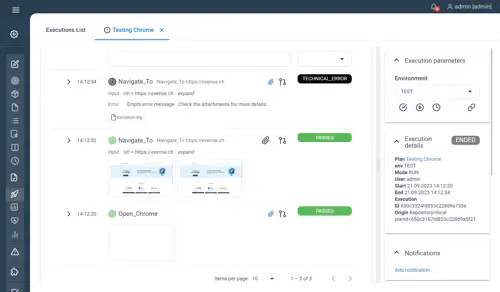
Once you executed the plan you can see as a result that the session objects have been properly retrieved and displayed as output. The last keyword throws an error because it is outside a session and cannot retrieve the objects anymore as the session was closed:

Storing by class name
You can also store your data using the class of the object. You will not need to cast it back but can only store one object per type :
@Keyword(name="PutToSession")
public void putToSession(){
  MyObject obj = new MyObject();
  session.put(obj);
}
this functionality is not available with the dotnet agent
this functionality is not available with the node agent
You can then access your data from another keyword without having to cast your object:
@Keyword(name="GetFromSession")
public void getFromSession() {
  MyObject obj = session.get(MyObject.class);
}
this functionality is not available with the dotnet agent
this functionality is not available with the node agent
Releasing session objects
When putting objects in session, it can be useful to have a way to free any resources used by this objects. A typical example will be to quit a Selenium driver when this driver is not used anymore.
This can be done by having the object in session implements Closable:
public class DriverWrapper implements Closeable {
  final WebDriver driver;
  public DriverWrapper(WebDriver driver) {
    super();
    this.driver = driver;
  }
  @Override
  public void close() {
    driver.quit();
  }
  public WebDriver getDriver() {
    return driver;
  }
}
public class DriverWrapper : ICloseable
{
private IWebDriver Driver;
public DriverWrapper(IWebDriver driver) {
this.Driver = Driver;
}
public void Close() {
Driver?.Quit();
}
public void GetDriver() {
return Driver;
}
}session.driver_wrapper = {
'driver': driver,
'close': function () {
this.driver.quit()
}
}When such object is put into a session, the close function will be called when the session finish. For example, when executing a chrome scenario using our step-library-kw-selenium/ library:
The first call to “Navigate_to” will succeed, but the second one will fail as the chrome driver is closed by then: