Customization
Controller properties
This section will provide information on the properties exposed through the “step.properties” located in the conf folder of the controller.
While most useful properties are documented as comments inserted directly into the config file, additional information may be provided here.
Cosmetics
As of 3.11, customization of step’s static resources (images, stylesheets) is made possible in a generic way. This new way overrides and replaces previous options.
Two key properties are used as part of cosmetics customization:
- cosmetics.folder
This property points to a local folder on the controller’s host in which alternate cosmetic resources are to be stored (by default, the conf/cosmetics folder is set in the properties file itself).
- cosmetics.interceptedResourceList
A comma-separated list of resources which are supposed to be replaces with custom resources. Defaults to “favicon.png,logotopleft.png,logologin.png,step-variables.css,viz-presets-ext.js”. These are step’s favicon image, the main logo in the top left corner, the login logo, step’s main stylesheet variables and the viz dashboard pre-configuration.
It is possible to define new Groovy macros that can be called in your step plan or in your HP ALM test description.
This advanced section describes the use of so-called agent token affinity evaluators.
Modifying the Screens Templates
As global administrator
You can customize the fields used by the different step artifacts in the “Admin -> Settings -> Screens” view:

As project administrator
As a a developer with the project administrator role, you can reach these settings via the “Settings -> Screens” view:

From the different screen templates available you can achieve the following:
executionParameters
Add a new input field to the plan execution pop-up. This will allow you to use this new parameter in your plan:


executionTable
Display an existing parameter in the execution list:

functionTable
Add a new parameter to your keywords. It will be useful for example for identifying multiple version of the same keyword:

Agent Routing and Affinity
Agent token affinity evaluators are used during Keyword routing to determine the best agent token to execute a Keyword on. During Keyword routing all the available agent tokens are iterated over. The role of the affinity evaluator is to give each agent token a score depending on how good each token matches the token selection criteria. The token with the highest score is selected for Keyword execution. A score of -1 means that the token doesn’t match the selection criteria and will not be selected for Keyword execution.
Configuring a custom evaluator
Since 3.11 step make it possible to use custom affinity evaluators. The default affinity evaluator (TokenWrapperAffinityEvaluatorImpl) should be enough in the majority of cases and you should only need custom affinity evaluators in some special cases. Before trying to use custom affinity evaluators be sure you have a very good understanding of Keyword routing and of the role of affinity evaluators.
Custom affinity evaluators are defined in step.properties with the following property: grid.tokens.affinityevaluator.classname=full.qualified.name.of.the.affinity.evaluator.Class
Affinity evaluators might require specific properties. These custom properties are defined in step.properties with the properties grid.tokens.affinityevaluator.x where x is the name of the custom property.
Default evaluator
The default affinity evaluator works as follow
- returns the count of the matching token selection criteria (mandatory and optional criteria)
- returns -1 if not all the mandatory token selection criteria are matching
This means that the token matching the highest number of criteria is selected. See class TokenWrapperAffinityEvaluatorImpl for more information.
CapacityAware example
The default affinity evaluator selects tokens independently of other parameters like the current load (token usage) of the agent and thus doesn’t guaranty an even distribution of the load on the different tokens. In some situation we might want to be sure that the load is distributed evenly over the agents. If you have this requirement the CapacityAwareTokenWrapperAffinityEvaluatorImpl would be better suited than the default affinity evaluator.
There are also situations where you need to run more than one agent instance per agent host (for instance 1 java agent and 1 .NET agent). In this case you might want to define the token capacity accross all the agents of a same host. You might for instance want to ensure that not more than one Keyword is executed on the same agent host at the same time. Doing this with the default affinity evaluator isn’t possible. The CapacityAwareTokenWrapperAffinityEvaluatorImpl makes it possible to define a token capacity per agent host (and not per agent instance).
To enable the CapacityAwareTokenWrapperAffinityEvaluatorImpl:
- add the following line to step.properties:
grid.tokens.affinityevaluator.classname=step.grid.tokenpool.affinityevaluator.capacityaware.CapacityAwareTokenWrapperAffinityEvaluatorImpl - create a file with following sample content. this file configures the desired token a capacity per agent host:
{"agents":[ {"hostname":"my-multi-agent-host-1","capacity":1}, {"hostname":"my-multi-agent-host-2","capacity":10} ]} - set the path to the above mentioned file in step.properties:
grid.tokens.affinityevaluator.configuration=/path/to/the/configuration.json
Configuring the CapacityAware evaluator
The configuration file defined by grid.tokens.affinityevaluator.configuration configures the CapacityAwareTokenWrapperAffinityEvaluatorImpl. The configuration file is formatted as json. It defines the maximal token capacity per agent host. The maximal token capacity defines the maximum number of Keyword executions for a specific agent host. To define the token capacity of an agent host, add the following entry to the array “agents” of the configuration file: {“hostname”:“my-multi-agent-host-XYZ”,“capacity”:1},
The hostname should be equals to the hostname of the agent displayed in the grid view in the URL column. If for instance the URL of one of the agents of the agent host displays:
http://my-agent-01.my.net:50056my-agent-01.my.netA capacity of -1 means unlimited.
If a host isn’t specified in this configuration file the capacity is unlimited per default.
The configuration file reloaded automatically on every change. A restart of the controller is therefore not required to take the changes into account.
Custom groovy macros
Installation
In order to use Groovy macros, three steps have to be done:
- First, you have to create a folder on the controller. This folder will contain the Groovy file defining your macros.
- The startup script should be modified by adding the new folder in the class path:
“%JAVA_PATH%java.exe” %JAVA_OPTS% -cp “..\lib*;..\templates” step.controller.ControllerServer -config=../conf/step.properties - A new line has to be added in the step.properties file. This option will allow you to specify the name of the Groovy class containing your marcos:
tec.expressions.scriptbaseclass=Templates
When these changes are done, you can then create your macros file in the new folder.
Note that:
- The controller has to be restarted each time you modify these options or the macro file
- The base name of macro file should have the same name used in tec.expressions.scriptbaseclass and have the .groovy extension (…\step-controller-X.Y.Z\templates\Templates.groovy in our example)
Validation
- In order to validate our groovy macro, we will download the following file and save it under …\step-controller-X.Y.Z\templates\Templates.groovy: Template.groovy
- You should now restart your controller for the new macro to be taken into account
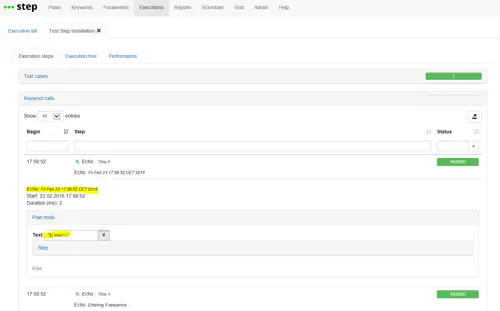
- You can now re-run the example test case. The function now() should be know and return the current date:

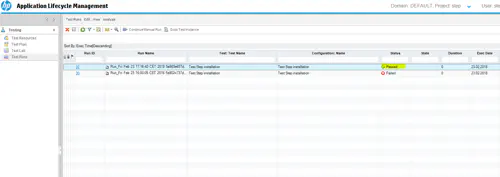
- As a final check, you can also ensure that the new test status is properly reflected in ALM:

Troubleshooting
The following exceptions can be faced when using Groovy Macros:
- Script1.groovy: 1: unable to resolve class WrongTemplate:
- The name in tec.expressions.scriptbaseclass didn’t match the name of your Groovy class
- The name of the folder didn’t match the name in the Java path
- groovy.lang.MissingMethodException: No signature of method: Script1.unknownMethod():
- The method name is misspelled
- Or our didn’t restart your controller after defining the new macros
Password strength policies
Starting with version 3.18, it is possible to define a number of policies that user passwords must adhere to.
Note that by default, no policies are active. The following policies can be defined:
Minimum password length
The minimum required password length can be specified as shown below.
security.password.minimumLength=4
Require character classes
To require that (at least one) upper case (A-Z), lower case (a-z), or numeric (0-9) character must be present, use these configuration options:
security.password.requireUpperCase=true
security.password.requireLowerCase=true
security.password.requireNumeric=true
Require special characters
If you want to enforce that (at least one) special character is present in the password, provide a list of the special characters to be checked, for example:
security.password.requireSpecialCharacter=!@#$%&*