Reporting
Executions give you an insight in the results of an executed Plan as well as the ability to detect and analyze errors, both within the Plan or the system tested / automated with it. To open it, click in the Execution list view on any Plan’s name, you want to inspect.
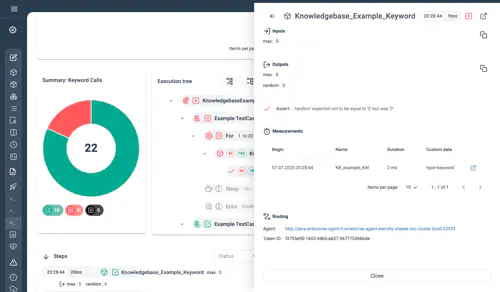
General Execution Information
The Execution Report provides insight into an on-going or alreaedy concluded execution. THe following general information are directly shown on top:
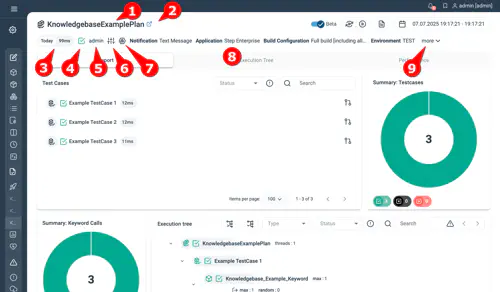
- The executed plans name
- A link to the plan
- The date when the plan was executed
- The current status of the execution
- The user initiating the execution
- Click to find a table of all resolved parameters
- Click to see on what agent(s) the plan was executed
- A list of all execution parameters
- If the execution parameters don’t fit the screen the remaining ones are listed under “more”
Test Cases
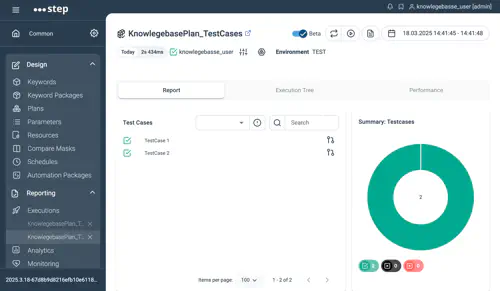
If you are using TestSet and TestCase objects as shown in the example below, a panel will show the status of the individual test cases. You can open a test cases details by clicking on it. In addition, you can re-execute just the selected test cases instead of the whole test plan by ticking its checkbox after clicking on the execute button.
Execution tree
The Execution tree shows your Plans Execution steps as defined in the plan editor. Each node represents all executions of this node, a number shown next to it will indicate if the node was executed more than once (i.e. because it was part of a loop-control).
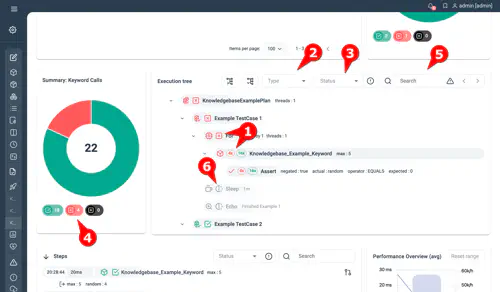
- The status is shown as an icon for single executions and as colored numbers for those with multiple iterations. If there are multiple stati (like in the example screenshot as the keyword was executed multiple times with different results) both will be shown.
- This is the type filter which will highlight all entities matching the selected control types.
- The status filter will highlight all nodes that match any of the selected stati.
- In the Keyword Calls summary we can quickly filter for all keyword calls matching the clicked status, this will be shown in the respective filters of the execution tree. (see above)
- The search input allows to search the execution tree. Search is performed on the executions raw data. As a result, configurations are matched by their IDs rather than the labels shown in the tree. This may lead to search results that differ from what is displayed, including occasional false positives or missed matches.
- Some nodes may be greyed out and marked with the partially executed symbol - there can be multiple reasons for this: a node was not yet executed (as in the example below), a node can’t be executed because it is not reachable (i.e. under an if-control) or a node is partially out-of-scope (i.e. we filtered for a time range or are looking at a partial tree and some children are not included).
If a node has multiple iterations, clicking it will show a list of all of them.
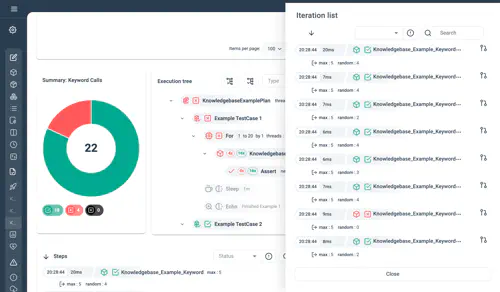
In case there is only a single iteration - or one iteration of the aforementioned iteration list is selected - the iteration details are shown.
Partial execution tree
In the new executions view, we introduced the concept of aggregating all iterations of a node. This allows the execution tree to match the plan editor’s tree 1:1, improving overall clarity. However, it also means that we display an aggregated form of the tree instead of an exploded one which would directly show all execution paths.
To support detailed debugging, a partial execution tree has been added to each execution node’s details view. When selecting any node and choosing a specific iteration, a partial execution tree is displayed. This tree reveals the exact execution path that led to the selected iteration in its context. It includes:
- The full path from the root node to the selected node.
- The children of the selected node.
- If the node is part of an iterative structure (such as a ThreadGroup), its direct siblings — providing full loop context.
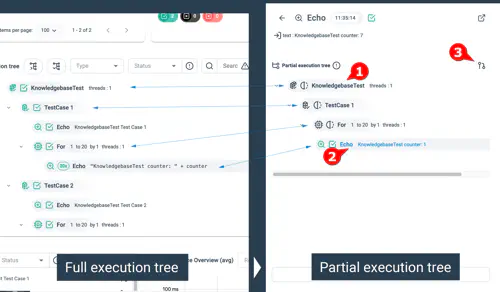
- The partial execution tree starting from the root node.
- The currently selected execution node for a specific iteration.
- Open the partial tree in a separate tab — useful for analyzing larger partial trees.
Execution steps
The execution steps show the details of the executed Plan, as shown in the following screenshot. By default, all steps (Keyword Calls & executed Controls) are in reverse chronological order.
You can use the search fields to filter the steps table as well as change the order:
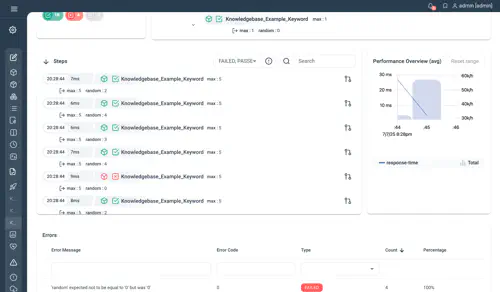
You can toggle each Keyword call to display their input and output details, and the Keyword measurements details. Clicking the inspect icon on the right, the step will be shown in the execution tree.
Errors
The errors view displays an overview of all collected errors, grouped by message or code type, that occur during the execution time:

Performance
The performance tab of the Execution view provides you with the most frequently required metrics like throughput and response time, as well as common metric and time range filters out of the box. This dashboard provides statistics over time and aggregated ones for the entire execution. The different charts and tables can be refreshed in real-time or browsed in a static version of the view. For more advanced queries like drill-downs based on custom dimensions, or raw measurement browsing, use custom graphical filters or Object Query Language (OQL).
For more general information and details on analytic dashboards check the dedicated analytics section.
Real-time monitoring
For an ongoing execution, the performance view will automatically cover the test’s current time range and be refreshed every 5 seconds, as illustrated in the screenshot below.
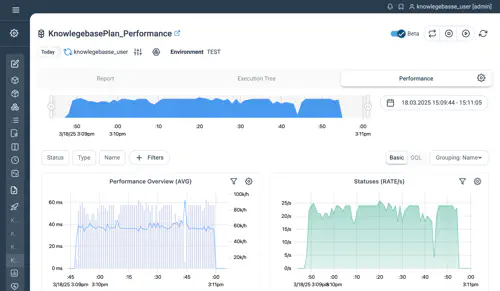
You are presented, from top to bottom and left to right with the following information:
- You are presented, from top to bottom and left to right, with the following information:
- A Performance overview chart showing aggregated results and overall measurements
- Aggregated Statuses chart showing the overall calls grouped by statuses
- Response Time chart showing the average response time by default. The metric can be changed using the button at the top right of the chart
- Throughput chart by measurements. The total throughput is displayed as a bar chart using the right axis
- Summary table of all metrics applicable to the measurements (including percentiles, median, counts, etc.) aggregated over the selected time interval
- Chart showing the number of parallel threads over time
See more details on Analytics Page Structure
Interacting with the dashboard
- You can change the refresh rate for running executions using the dedicated refresh icon at the top right of the view.
- Filtering can be done directly using the top filter selections. The measurements to be displayed or hidden can be selected from the statistics table or configured in the charts options. See more about filters here
- The time range selection can be done at different levels and will be applied to all dashboard widgets. See more about time range controls here.
- The grouping option allows for custom aggregations of the response times and throughput charts, together with the table view. See more about grouping here.
- The dashboard allows some global settings (like charts resolution and compare mode), but also measurements specific settings, like custom metrics, with the ability to hide or show specific data. See more about visual settings here.
Exporting measurements
In case you’d like to use your own toolset to process the raw data, you can use the export entry from the settings menu (top right of the screen). This will include the active filters and time range selection. You will find more details in the dedicated analytics documentation.
Execution control actions
While an execution is running or even after it finished actions are provided to quickly manage another execution or to stop the current execution:
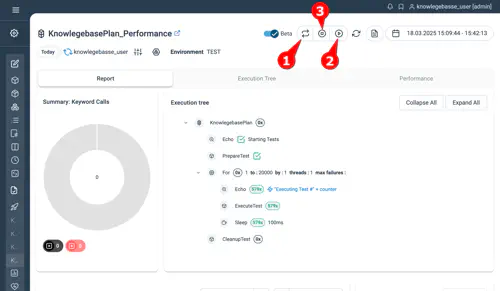
- Execute the same plan with identical parameters
- Execute the same plan and select different parameters / test cases
- This button is only shown while the execution is running. Clicking it will stop the current execution and show a red force stop button if it takes longer to end it. Using the red button Step can be instructed to also interrupt the current keyword execution and not wait for it to finish. Note: Currently this feature is only supported for K6 Keywords, the execution of all other Keyword types will continue until completion.
Time range selector
With the time range selector the execution time can be filtered to only show a certain time range of the execution. This selector is explained in more detail in the analytics page
Use Legacy page
You can optionally continue to use the Legacy Execution Report page.
There are two ways to access it:
-
Globally (admin setting):
An admin can configure the Step properties by settingui.reporting.force.legacytotrue(default isfalse). This will deactivate the Beta Execution Report for all users. -
Individually:
Each user can switch back to the legacy view by deselecting the “Beta” toggle in the top right corner of the Execution Report page. This preference will be stored in the browser.
