Grafana k6 Plugin
Grafana k6 is a powerful, open-source load testing tool developed by Grafana Labs. It is widely used for scripting and executing performance tests with high efficiency and developer-friendly ergonomics.
The k6 plugin for Step enables seamless integration of existing k6 scripts into the Step platform, unlocking a broader range of automation capabilities. This integration allows users to combine the strengths of both tools, leveraging k6’s expressive scripting model alongside Step’s orchestration, scheduling, and extensibility.
Key Use Cases
With the Step k6 plugin, you can:
- Repurpose existing k6 scripts for disciplines beyond load testing, such as synthetic monitoring, functional test automation, etc.
- Execute k6 scripts at scale, benefiting from Step’s distributed execution and centralized management.
- Define complex mixed scenarios, combining k6 with other supported tools like Playwright, to simulate realistic multi-layered workflows.
🛈 Availability: The k6 plugin is available in both Step Enterprise and Step SaaS editions.
What This Page Covers
This guide walks you through the process of installing, configuring, and using the Grafana k6 plugin within Step. Whether you’re migrating existing load tests or building new hybrid monitoring flows, this documentation provides the foundation to get started quickly and effectively.
Installation
Install from archive
If you’ve installed Step from the archive distribution, you have to install k6 on your agents. Follow the official documentation of k6 for this.
By default, the k6 executable will be launched from your ${PATH}. You can define another installation folder by using the following property in the configuration file of your agent:
plugins.k6.folder: "C:\\Program Files\\k6\\"
Install in Kubernetes
If you’ve installed Step within Kubernetes with an official agent runtime images of Step, k6 has to be installed as external dependency. Future images will include the k6 binaries directly.
If you’re using a custom runtime image for you agents, you have to ensure that k6 is installed and available in the path.
SaaS
In the Step SaaS, k6 is available by default in all agent pools. Nothing specific has to be done for the installation.
Usage
Define a k6 Keyword
To integrate a k6 test into Step, you begin by defining a Keyword of type k6. This Keyword acts as a wrapper around your k6 script and makes it accessible within your Step plans. Once the k6 Keyword is defined, you can reference it like any other Keyword in your workflow. This allows you to seamlessly embed load testing steps within broader scenarios that may include other tools or business logic.
In the Step UI
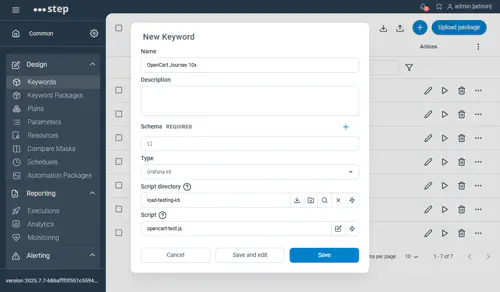
To create a k6 Keyword through the Step UI, navigate to the Keywords section and click on New Keyword. Select the type Grafana k6, then upload your k6 script. Once uploaded, configure the Keyword parameters as needed.
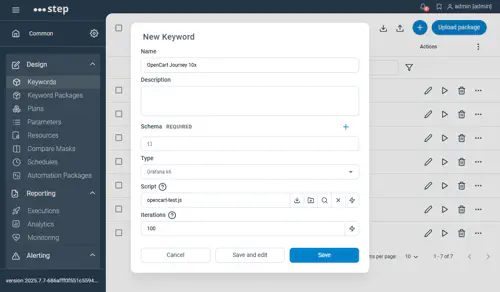
If your k6 test is structured using modules, you can upload a ZIP archive of the directory containing your main script along with all required module files. In this case, be sure to specify the path to the script to be executed in the field Script. The path is relative to the root of the zipped directory. This allows Step to correctly locate and execute your modular k6 test.
Three basic options are visible by default:
- Iterations: defining the total number of script iterations to be executed across all VUs
- Duration: defining the total duration of the test. Note that the duration should include a suffix indicating the time unit (like ’10s’ or ‘5m’)
- Virtual Users (VUs): defining the number of VUs to run concurrently
In an automation package (YAML)
k6 Keywords are fully supported by automation packages. The declaration of k6 Keyword is documented on the automation package descriptor page
You’ll find samples of automation packages with k6 in the Step samples project in GitHub.
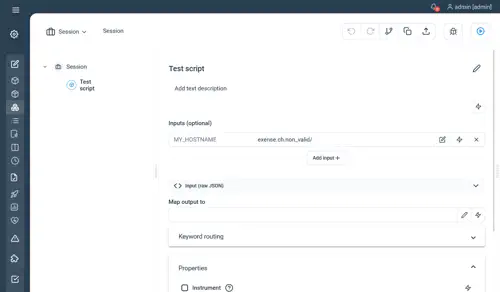
Pass Keyword inputs to k6
It is possible to pass input to your k6 keyword. These input parameters will be passed as environment variable to your script:
Example
- Let suppose you defined a k6 keyword using the following script:
import http from 'k6/http';
import { sleep } from 'k6';
import { check } from 'k6';

export const options = {
  thresholds: {
     checks: ['rate>0.9'],
  },
};

export default function () {
  const r = http.get(`https://${__ENV.MY_HOSTNAME}`, { tags: { name: "My Http request" } });

  check(r, {
    'response is status 200': (r) => r.status === 200,
  });

  sleep(1);
}
- And execute it with the following input:
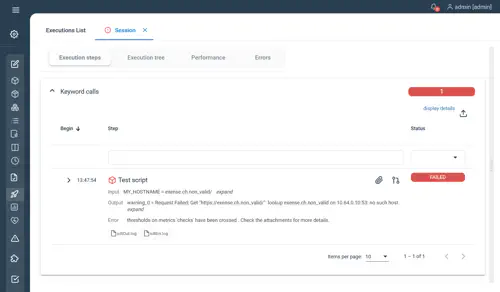
- You will get the following result, indicating that the script takes the value of the input given for constructing the URL:
Pass Keyword properties to k6
Keyword properties are passed to k6 as environment variable.
- In order to avoid conflicts with keyword inputs and other environment variables, the name of each property is prefixed with ‘PROPERTIES_’
- As k6 doesn’t support special characters in environment variable names, all non alphanumeric characters are replaced by ‘_’
For example, a keyword property called “user.password”, it will be passed to k6 as environment variable as “PROPERTIES_user_password” and will be accessible within the k6 script as
__ENV.PROPERTIES_user_password
Keyword Output
When executing a k6 keyword, the following results will be available in Step
- In case of error (or any content in k6 error output), the k6 standard Output and standard Error logs are attached to the execution
- If debug is activated, the k6 standard Output and standard Error logs are systematically attached to the execution
- If your browser-based keyword generated screenshots, these files will also be attached to the execution
- Finally, the following metrics will be collected and available in the analytics dashboard
- trend
- gauge
- rate
- counter Note that the metrics are given by default as average or sum of the execution:
- counter measurements are given as the sum of all the value encontered for this counter
- rate and gauge are given as an average of the all the value
- trend is given as an average by default, but you can collect all the non-aggregated measurements by setting the measuresAsAvg parameter to “false” (“true” by default)
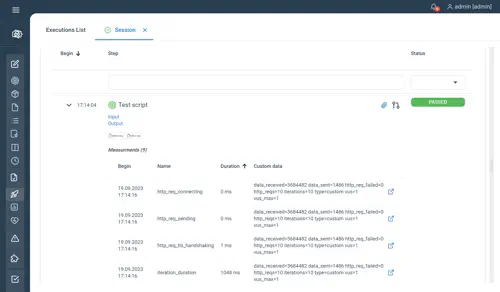
For example, below is the result of an successful execution with debug activated:
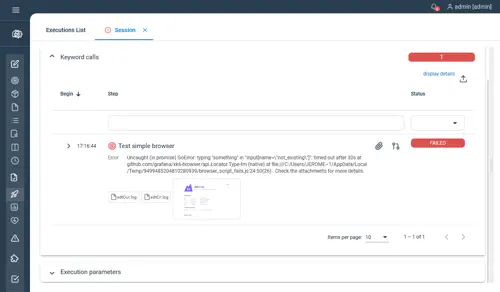
Another example with a browser-based keyword, including a screenshot and an error:
Advanced options
It is also possible to controller the options passed to the k6 process via the Other Grafana k6 options dropdown:
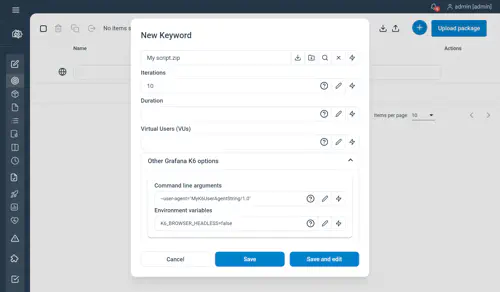
This screen allows you to define options via:
- Command lines: in this example, we override the default user agent
- Environment variables: some options can only be passed as environment variables. In this case, we change the Headless option of the browser
Defining default values for your inputs
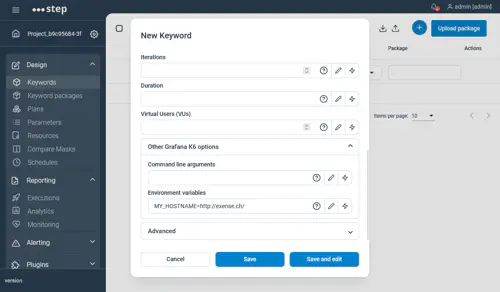
As input values are passed to the k6 script as environment variables, you can define default values to your inputs using the advanced options.
For example, defining the foillowing environment variable for the script of the previous example will force the script to use http://exense.ch/ as the default value for the input parameter MY_HOSTNAME
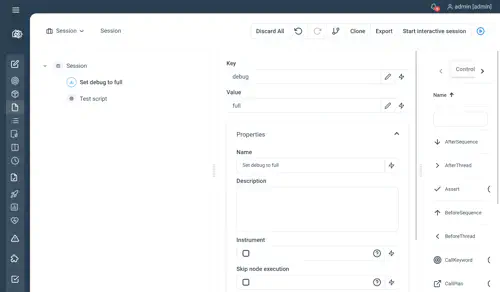
Activating the debug mode
The debug mode can be activated by setting a parameter named debug to true or full:
This will activate the debug for Http scripts and browser based scripts