Jira Xray
Starting with version 20, Step Enterprise Edition provides support for integration with the popular Xray Test Management plugin for Jira. Both the Cloud and the Server edition of Xray are supported.
Installation and Configuration
In order for Step to integrate with Jira and Xray, the systems will need to communicate with each other. The requirements differ between the editions of Xray, so please follow the steps for the Xray edition you want to integrate with.
Xray Cloud: Preparation
- Determine the Base URL to access your Jira Cloud instance. This is usually something like
https://yourcompany.atlassian.net/, without further path components. To verify that the URL is correct, try to browse all issues in a browser, using a URL like https://yourcompany.atlassian.net/rest/api/2/search . If you are receiving a meaningful JSON response, then the base URL is correct. - Determine a Username and API token for accessing the Jira instance. Step will be using this information when interacting with Jira, in other words, all actions will be performed as the specified user. It is recommended, but not necessary, to create a separate technical user for this purpose. It is highly recommended to generate a separate API token specifically for the Step interactions. To create API tokens for Jira, see the relevant Jira documentation
- Determine a Client Id and Client Secret for accessing the Xray Cloud instance, creating one if needed. The respective settings can be found in the Jira Settings > Apps > Xray > API Keys section. For more information, see the relevant Xray documentation
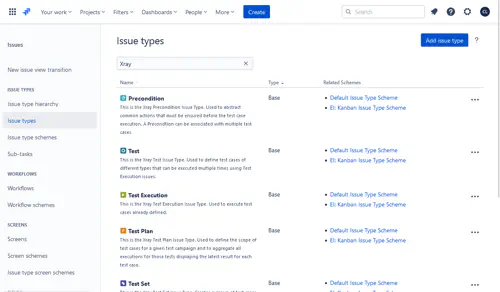
- Determine the Issue Type Names in your Jira installation for the following Xray issue types:
Test,Test Set,Test Plan,Test Execution. The names can be configured and checked in the Jira Settings > Issues > Issue types section, see the following image for what to look for:
Xray Server: Preparation
- Check your Jira version. You will need at least Jira version 8.14 for the integration to work.
- Determine the Base URL for accessing your Jira instance. Depending on your installation, this may or may not include path components, for instance
https://jira.example.com/jira/. Please take note of the full URL, including any necessary path components and trailing slash. To verify that the URL is correct, try to browse all issues in a browser, using a URL like https://jira.example.com/jira/rest/api/2/search . If you are receiving a meaningful JSON response, then the base URL is correct. - Determine (or create) an API token for accessing the Jira instance. Step will be using this information when interacting with Jira, in other words, all actions will be performed as the specified user. It is recommended, but not necessary, to create a separate technical user for this purpose. It is highly recommended to generate a separate API token specifically for the Step interactions. To manage API tokens for Jira, go to the Personal Access Tokens section of the User Profile of the respective Jira user.
- Determine the Issue Type Names in your Jira installation for the following Xray issue types:
Test,Test Set,Test Plan,Test Execution. The names can be configured and checked in the Jira Settings > Issues > Issue types section.
Step configuration
The configuration for Step is performed in the step.properties file on the controller. It uses the single key repository.jira.xray.configuration,
however the value is a JSON object. Attention: the entire configuration string must be minified to a single line in the configuration (more on this below).
Here’s a glimpse of what the final result should look like (most content omitted):
repository.jira.xray.configuration={"remotes":{"cloud1":{"xrayKind":"CLOUD",...}}}
This configuration item can be changed on the fly, i.e., the Step controller will automatically pick up changes without requiring a restart.
Annotated example
The following shows an example configuration which defines two remote Xray endpoints named server1 and cloud1.
Configurations can contain an arbitrary number of remote endpoints, where each is configured separately.
{
    "remotes": {
        "server1": {
            "xrayKind": "SERVER",
            "jiraBaseUrl": "https://jira.example.com/jira/",
            "auth": {
                "jiraBearer": "AbcdEFghij1234567890WXyzAbcdEFghij1234567890",
                "clientAuthentication": {
                    "certificateFile": "/path/to/clientcert.p12",
                    "passwordBase64": "c2VjcmV0cGFzc3dvcmQ="
                }
            },
            "urlRewrites": {
                "https://jira.example.com/jira/rest/": "https://waf.example.com/secure/JiraRestFirewall/"
            }
        },
        "cloud1": {
            "xrayKind": "CLOUD",
            "jiraBaseUrl": "https://example.atlassian.net/",
            "auth": {
                "jiraUser": "firstname.lastname@example.com",
                "jiraToken": "AbcdEFghij1234567890WXyz",
                "xrayId": "ABCDEF0123456789ABCDEF0123456789",
                "xraySecret": "abcdef0123456789abcdef0123456789abcdef0123456789abcdef0123456789"
            },
            "xrayIssueTypeNames": {
                "Test": "Xray Test",
                "Test Set": "Xray Test Set",
                "Test Plan": "Xray Test Plan",
                "Test Execution": "Xray Test Execution"
            },
            "proxy": {
                "type": "PAC",
                "url": "http://proxyconf.example.com/proxies.pac",
                "pacMyIpAddress": "10.20.30.40"
            }
        }
    }
}
Legend:
- mandatory parts of the configuration are shown in red.
- optional, but common configuration is shown in green.
- optional and seldomly used configuration is shown in gray.
- Finally, endpoint names are shown in blue.
Configuration items
remotes
This mandatory top-level element serves as a container for the Xray endpoint sections. An arbitrary number of sections is supported.
endpoint sections
For each endpoint, a separate JSON object must be placed in the remotes object, where the “key” is the desired name for the endpoint.
This name will be used to access Xray test items from within step, as described later.
There are no restrictions for the names of the endpoints (except that they must all have different names), but we strongly recommend to use only alphanumeric characters.
xrayKind
This mandatory configuration item determines the kind (or edition) of the Xray endpoint that is to be interacted with.
This is required, because the cloud and server editions use entirely different APIs. The only allowed values are CLOUD and SERVER (case-sensitive).
jiraBaseUrl
This mandatory configuration item determines the URL to interact with. Please see the relevant Preparation section above for how to determine the correct URL.
auth
This mandatory configuration section provides information about how step should authenticate with the given endpoint. The items that must be defined in this section differ depending on the Xray edition:
- For the cloud edition, the items
jiraUser,jiraToken,xrayId, andxraySecretmust be provided. They correspond to the information described in steps 2 and 3 in the Xray Cloud Preparation section above. - For the server edition, the item
jiraBearermust be provided. It corresponds to the API key described in step 3 of the Xray Server Preparation section above.
xrayIssueTypeNames
This configuration section is optional, but might be needed if your Jira instance uses non-default names for the Xray issue types.
In the Preparation section above, you were asked to take note of the names of the Test, Test Set, Test Plan, and Test Execution issue types.
If these issue types are named exactly as shown here, then there is no need to configure this section. However, if one or more of the issue types have a different name,
this configuration section must be defined, specifying the actual name for each issue type which has a non-default name.
clientAuthentication
This subsection in the auth section is optional and only required in very specific circumstances, namely if the endpoint to interact with requires X509 client certificates.
If your company has such requirements in place, you must define:
certificateFile: a keystore file, which must contain a single certificate and corresponding private key, in P12 format. This file must be readable by the Step controller.passwordBase64: the password to decrypt the certificate file. It must be encoded using Base64. This is a (minimal) security measure just so the password is not immediately visible in plain text in the configuration, but it can of course be trivially decoded.
urlRewrites
This section is optional and only required in very specific circumstances, namely if the actual Jira server cannot be accessed directly, but must be accessed through a security gateway or similar appliance. It contains key/value pairs, containing (literal) replacement patterns to perform on the URLs before interacting with them.
For instance, with the example configuration shown above, the URL https://jira.example.com/jira/rest/api/2/search would be rewritten to https://waf.example.com/secure/JiraRestFirewall/api/2/search,
and Step would then use the rewritten URL to interact with the remote endpoint.
proxy
This section is optional and may be used to define the proxy that will be used when connecting to the Xray/Jira endpoints. It contains the following items:
type: mandatory, its value must be one of the exact stringsSTATICorPAC.url: mandatory. This must contain a value as follows:- if
typeisSTATIC, theurlmust contain a string defining the protocol, host name or IP, and port, for instancehttp://proxy.example.com:3128orhttps://[2001::1:2:3]:8443. The supported protocols arehttpandhttps; IP addresses should be provided in the regular dotted format for IPv4, and in brackets as shown in the example for IPv6. The port is mandatory, and URL paths (i.e., path specifications after the port) are not allowed. - if
typeisPAC, theurlmust contain a string defining where a Proxy Auto-config file to use can be retrieved.
- if
pacMyIpAddress: optional, only relevant iftypeisPAC. See notes below.
Notes:
- When a proxy is defined, all connections to the target hosts (Jira and Xray) will be made through the proxy. However, the proxy itself (or the autoconfiguration file in the case of PAC) must be directly reachable from the Step controller.
- Proxy authentication (i.e., authentication to the proxy itself, not the target system) is not supported. Authentication to the target system is unaffected by this, the respective HTTP headers will simply be forwarded by the proxy.
- When using a proxy autoconfiguration (PAC) file, the configuration file is retrieved from the specified URL and locally evaluated. The full specification as defined here is supported; however, only HTTP or HTTPS proxies will be utilized. In other words, SOCKS proxies may be present in the file and will be parsed without error, but they cannot be connected to.
- When using a PAC file which evaluates the client’s own IP address using the
myIpAddressJavascript variable, it may be necessary to explicitly define the IP address that will be used (using thepacMyIpAddresssetting). This is because especially in containerized setups, the system may not be able to automatically and reliably determine its own address to use for this variable. As per the specification, only IPv4 addresses are supported for this variable.
Configuration helper
The editor below contains the sample configuration shown above, ready for editing. It also allows you to easily minify the configuration to a format that is ready for copy-pasting into the configuration file.
Plugin Usage
Test Definitions in Xray
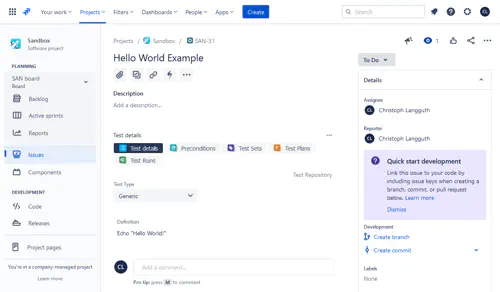
The test case design relies on the standard plain text syntax of Step. Test cases are created by using the Xray Test issue type. Currently, the Test Type must be set to Generic, the actual code is then entered into the Definition field.
Here’s an example for the Cloud version:
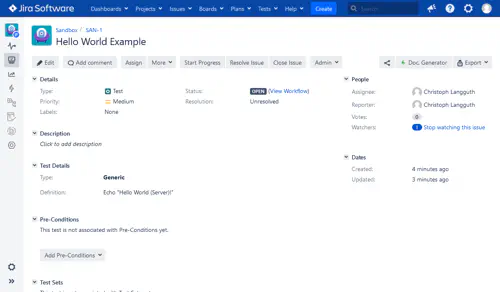
And here’s how it looks in the Server version:
Executing Tests
In order to run Tests defined in Xray, point your browser to a URL with the following pattern:
https://STEPSERVER/#/repository?repositoryId=jira-xray&remote=cloud1&issue=ISS-123
where:
- STEPSERVER is the Step Server
- cloud1 is the name of an endpoint defined in the Xray integration configuration (see above)
- ISS-123 is the Jira Issue Name
Here is an example of the UI which is displayed for a successful retrieval of an issue of type Test Plan:
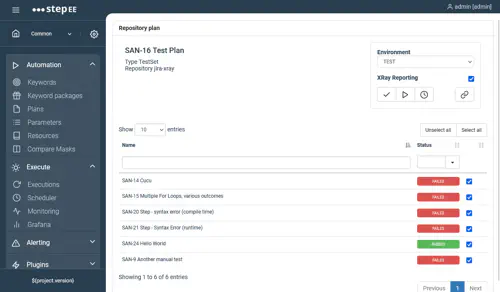
From there, you can start executing the test case(s).
Execution Behavior
Depending on the Xray issue type, Step will behave slightly differently:
- For Test Plans, you can select which of the Tests referenced in the Plan should be executed. If reporting is enabled (see below), a new Test Execution issue referencing the Tests which were run will be created in Jira.
- For Tests, only the single Test will be executed. If reporting is enabled, a new Test Execution issue referencing the Test will be created in Jira.
- For Test Executions, you can select which of the Tests referenced in the existing Test Execution should be executed. If reporting is enabled, the currently active Test Execution will be updated with the results, instead of creating a new one. This may be useful if you want to repeatedly execute Tests without cluttering Jira with new Test Execution issues.
- Other Xray issue types are not supported. In particular, if you wish to execute a Test Set, create a Test Plan from the Test Set, and execute the Plan.
Reporting
By default, whenever Tests are executed, the results are reported back to Jira.
You can disable reporting on a per-execution basis by creating an execution parameter named xray_reporting.
Here’s an example for setting it up:
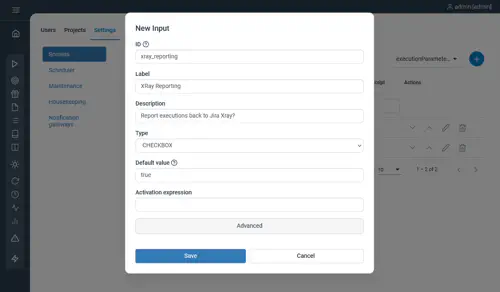
In fact, the screenshot above (where the Test Plan is imported) already includes the checkbox resulting from this definition.
Attachments / Evidence
When attachments such as screenshots are produced during a Step execution, these attachments are added to the Xray execution report (called Evidence in Xray parlance). However, Xray limits the total size of the reports that can be uploaded to approximately 100 MB. Therefore, if an execution produces very many and/or large attachments, it may not be possible to include all of them in the report.
To control the behavior, an execution parameter named xray_attachment_quota_bytes may be utilized to control the maximum size of attachments that will be sent to Xray. The default value is 90000000 bytes – in other words, this is the value that will be used if you do not explicitly define the parameter.
Attachments will be appended to the report as evidence as long as their total (Base64-encoded) size does not exceed this value, otherwise they are omitted from inclusion in the report. You can define the parameter with any value you wish. For instance, you could completely disable sending attachments to Xray by setting this value to 0. You can also increase this value from the default – but at your own risk: if the total report size becomes too large, Xray may not accept it, and therefore reporting of the execution results would fail in such cases.
Two-way integration
In order to provide an even more seamless experience, it is possible to launch Step executions directly from Jira as well. Technically, this is done by setting up Jira to send API calls to the Step server which trigger the execution.
Prerequisite: Step API key
Just like Step requires credentials for accessing Jira, the same is true for interactions in the reverse direction.
Therefore, the first requirement is to note (or create) an API key in Step. All actions which use an API key are performed in the context of the Step user the API key belongs to.
Invocation and message
- URL: https://STEPSERVER/rest/repositories/jira-xray/execute
- HTTP method: POST
- Required HTTP header: Authorization: Bearer STEP_API_KEY (replace with the actual API key from the previous section)
Message payload
Here’s a complete JSON message, the individual fields are explained below. All fields are mandatory except where noted.
{
  "remote": "cloud1",
  "issueKey": "ISS-123",
  "executionDescription": "{{issue.key}}: {{issue.summary}} ({{initiator.displayName}})",
  "tenant": "Common",
  "parameters": {
    "env": "TEST",
    "xray_reporting":"true"
  }
}
remote
This is the name of the Jira Xray instance (as defined in the configuration) that step will interact with when receiving the request.
issueKey
This is the key of the Jira issue that should be executed.
tenant
This is the name of a Step project. Execution will take place in the context of the given project.
parameters
This is an optional field containing a map of parameters (key/value) to set for the execution. Which parameters exist and how they affect the execution depends on the configuration of your Step instance.
executionDescription
This field is technically optional, but we highly recommend setting it, as it allows to specify how Step will name and display the execution. You have complete freedom with the information that you want to use, including Jira smart values such as Issue Key, name, who initiated the execution, etc.
For instance, the value shown above ( "{{issue.key}}: {{issue.summary}} ({{initiator.displayName}})") may, after the substitutions performed by Jira, result in the value "ISS-123: Run a test using Step (John Doe)", which is what gets sent to Step, and will then be shown as the execution description.
Note that if this field is not provided, Step will fall back to a legacy description, resulting in names like “Execution of cloud1/ISS-123”.
initiator
This is an optional field for informational purposes.
Remember that from Step’s point of view, all actions are performed as the Step user identified by the API key. Using this field, it is possible for instance to convey information about which Jira user triggered the execution request.
The execution will then show in Step as “Execution of cloud1/ISS-123 triggered by Donald Duck”.
Example: Integration in Jira Cloud
The Cloud version of Jira already includes a useful automation plugin which we use for showcasing the integration.
Definition
The below screenshot shows a working definition of a rule for triggering Step executions.
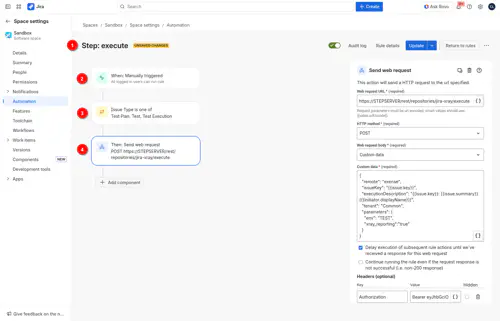
Here are a few more explanations concerning the highlighted items:
- “STEP: execute” is simply the rule name we chose. You can of course use a name to your liking.
- The rule must be manually triggered (see the Usage section below).
- We define a filter, so this rule is only available on issues of type Test Plan, Test Execution, and Test. This corresponds to the issue types supported by Step; any other issue types would cause an error during Step’s execution attempt anyway, so there is no need to even show the rule for them.
- Finally, this is the definition of a Web request to send. You will notice that the configuration corresponds exactly to the description above.
In the payload data, Jira variables are used to set the content of the
issueKeyandexecutionDescriptionvalues dynamically.
Usage
Here is a screenshot showing the integration defined above in action:
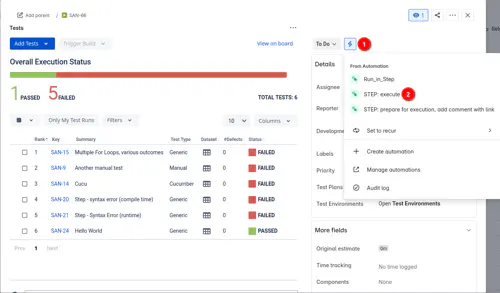
- Click on the little flash icon to open the available automation rules.
- Select the rule to execute.