Automation Package descriptor
Automation Packages are defined in a declarative way using YAML alongside the automation code. The Step Automation Package YAML syntax is specified by the Automation Package JSON schema, for more convenient work you can configure the embedded file editor in your IDE (IntelliJ IDEA or Visual Studio) to associate this schema with the Step YAML automation packages.
For Java Automation Packages, it is possible to directly declare certain entities in the code in addition to the YAML descriptor.
YAML descriptor
The automation package description is specified in a file name automation-package.yaml by convention. The top-level nodes of this descriptor consists of the following fields:
- name - the name of automation package
- version - the version of the YAML automation package schema. This field is optional, but recommended to keep the information about the json schema version you have used and to be notified in case of mismatch.
- keywords - fragment containing the keywords specifications
- plans - fragment containing the plans specifications
- schedules - fragment containing the schedule specifications
- alertingRules - fragment containing the alerting rules specifications
Each fragment is optional.
Example:
---
version: 1.0.0
name: "load-testing-k6-automation-package"
keywords:
  - K6:
      name: 'OpenCart home'
      vus: 1
      iterations: 1
      scriptFile: "opencart-test.js"
plans:
  - name: "Opencart load test plan"
    root:
      testScenario:
        children:
          - threadGroup:
              users: 5
              iterations: 10
              children:
                - callKeyword:
                    keyword: "OpenCart home"
Keywords
Automation Packages support all Step Keyword types in a declarative way except for Astra, QF Test and PDF Test keywords. This includes for instance Java-based keywords (Playwright, Cypress, Selenium, etc), JMeter keywords and Grafana K6 keywords. You may read the related documentation for details on the configuration properties related to each keyword type, the same are available in YAML format.
Following sections give some details for a subset of these keyword’s types
Java keywords
Java keywords are supported natively with the Java @Keyword annotation and do not have to be specified in the YAML descriptor. In other words, any Keywords defined in the Java code contained in the automation package will be part of the package.
Please note that Java Keywords can include any third-party library and can thus be used to declare Keywords relying on Selenium, Playwright, or any other library supporting Java.
JMeter
Existing JMeter test plans can be declared as Keyword in automation packages using the JMeter keyword type as follows:
keywords:
  - JMeter:
      name: "JMeter keyword from automation package"
      description: "JMeter keyword 1"
      jmeterTestplan: "jmeterProject1/jmeterProject1.xml"
Fields:
name: an arbitrary name for the Keyword. This name will be used in the plan to reference the KeywordjmeterTestplan: the relative path to the JMeter test plan (xml)
Refer to the automation package schema for an exhaustive list of supported fields.
Cypress
Cypress Keywords can be declared in automation packages using the Cypress type as follows:
keywords:
  - Cypress:
      name: eCommerce - Typical visit
      cypressProject: cypress-test/
      spec: "opencart.cy.js"
Fields:
name: an arbitrary name for the Keyword. This name will be used in the plan to reference the KeywordcypressProject: the relative path to the Cypress project containing the cypress.config.jsspec: the filename of the Cypress spec to be executed
Refer to the automation package schema for an exhaustive list of supported fields.
Read more about the Cypress integration here
K6
Existing K6 tests can be declared as Keyword in automation packages using the K6 keyword type as follows:
keywords:
  - K6:
      name: 'OpenCart home'
      scriptFile: "opencart-test.js"
      vus: 1
      iterations: 1
Fields:
name: an arbitrary name for the Keyword. This name will be used in the plan to reference the KeywordscriptFile: the relative path to the K6 file to be executedvus: optional number of VUs to run concurrently (K6 option ‘vus’)iterations: optional number of iterations to be executed by each VU (K6 option ‘iterations’)
Refer to the automation package schema for an exhaustive list of supported fields.
Read more about the K6 integration here
.NET
.NET keywords can be declared in automation packages using the DotNet type as follows:
keywords:
  - DotNet:
      name: "Open_Chrome_and_search_in_Google"
      dllFile: "DotNet/SeleniumKeywords.dll"
      librariesFile: "DotNet/AllDlls.zip"
Fields:
name: the name of the Keyword. This name will be used in the plan to reference the Keyword. It should match the name of the Keyword contained in the referenced DLLdllFile: the relative path to the DLL file containing the KeywordlibrariesFile: optional path to the folder containing the library DLLs
Refer to the automation package schema for an exhaustive list of supported fields.
Read more about the .NET integration here
Node.js (JavaScript / TypeScript)
JavaScript / TypeScript keywords can be declared in automation packages using the Node keyword type as follows:
keywords:
  - Node:
      name: MyNodeKeyword
      jsfile: nodejs-keywords/
Fields:
name: the name of the Keyword. This name will be used in the plan to reference the Keyword. It should match the name of the Keyword contained in the referenced projectjsfile: the relative path to the Node.js project containing the Keyword definitions. This project should contain the package.json file and the keyword definitions in the folder keywords/
Refer to the automation package schema for an exhaustive list of supported fields.
Read more about the Node.js integration here
Oryon
Oryon keywords can be declared in automation packages using the Oryon keyword type as follows:
keywords:
  - Oryon:
      name: OryonKeyword
      scriptFile: oryon-script.groovy
Fields:
name: an arbitrary name for the Keyword. This name will be used in the plan to reference the KeywordscriptFile: the relative path to the Oryon script
Refer to the automation package schema for an exhaustive list of supported fields.
Composite keyword
Composite keywords can be declared in automation packages using the Composite type.
keywords:
  - Composite:
      name: "Composite Keyword"
      plan:
        root:
          sequence:
            children:
              - echo:
                  text: "In Composite keyword"
              - return:
                  output:
                    - compositeOutput: "Composite Keyword output value"
The node plan contains the composite plan and follows the same structure as normal plans.
Read more about the Composite Keywords here
Plans
Plans are fully supported by the YAML format meaning that you can define plans in YAML identical to the ones created with the visual editor in Step. To understand the purpose and configuration of the many plan controls, refer to the dedicated documentation
Plans syntax
The plans are represented by a tree structure as in the visual plan editor and must contain a root node defining the type of plans (test set, test case, test scenario …). The different nodes share at least the following common properties:
- nodeName - [optional] name this node
- categories - [optional] list of categories assigned to this plan (categories can be used to filter plans for local and remote executions. See Filtering Plans).
- description - [optional] some textual description for the node
- children - [optional] the list of children of this node
Refer to the Controls documentation for the documentation and examples of the supported controls.
For instance, the following YAML descriptor contains a single plan of type test case invoking a keyword named “My Keyword”
---
name: "My automation package"
plans:
  - name: "Simple plan"
    categories:
      - "FunctionalTests"
    root:
      testCase:
        children:
          - callKeyword:
              keyword: "My Keyword"
Convert visual plan to YAML
To convert existing plans to YAML or to help you develop plans in YAML syntax, you may generate the plan in YAML format from the visual plan editor.

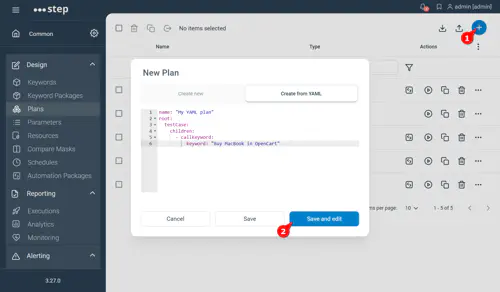
Convert YAML to visual plan
You can create a visual plan by providing its YAML source in the UI:
Advanced keyword call
In order to pass inputs to a keyword or to route the execution of the said keyword to specific agents, following syntax is used:
---
name: "My automation package"
plans:
  - name: "Simple plan"
    root:
      testCase:
        children:
          - callKeyword:
              keyword: "My Keyword"
              inputs:
                - myInputNumber: 1
                - myInputBoolean: true
                - myInputString: "some input"
              routing:
                - agentOS: "windows"
Dynamic expressions
As in the visual plan editor many input fields for plan controls accept either a literal value or a dynamic expression evaluated with groovy, for instance to resolve the value of a variable. The same is possible with the YAML syntax.
Example of a thread group defined with literal values:
- threadGroup:
  users: 5
  iterations: 10
Example of a thread group defined with variables:
- threadGroup:
  users:
    expression: "nbUsers"
  iterations:
    expression: "nbIterations"
Controls - YAML specificities
While most controls properties are identical to the one of the visual plans or self-explanatory, there a few exceptions.
AssertMetric
In YAML, the metrics names are slightly different than in the UI, here are the mapping from YAML to UI:
- response-time: “Response time”
- executions/count: “Execution count”
- executions/failure-percentage: “Execution failure percentage”
- executions/failure-count: “Execution failure count”
- executions/failures-count-by-error-code: “Execution failure count by error code”
Agent provisioning settings
When running in Kubernetes, Step supports automatic provisioning of Agents. This section explains how to define the provisioning settings in Automation Packages.
The provisioning settings can be defined for each Plan using the agents field.
Refer to the Agent provisioning page for more details about this feature.
Enable automatic determination and provisioning of agents
To enable the automatic determination and provisioning of Agents, the field agents has to be set to “auto_detect” as follows:
---
version: 1.0.0
name: "my-automation-package"
plans:
- name: "OpenCart okhttp Load Test"
  agents: auto_detect
  ...
Manual specification of agents
In order to specify the agents manually, a list of pools can be defined in the agents field:
---
version: 1.0.0
name: "my-automation-package"
plans:
- name: "OpenCart okhttp Load Test"
  agents:
  - pool: java-enterprise-agent
    replicas: 2
    image: docker-dev.exense.ch/test:agent-java-custom
It supports 3 fields:
- pool: specifies the name of the pool template to be provisioned. You can get the list of available pool in the UI (see previous section).
- replicas: specifies the number of agents to be provisioned.
- image: optionally specifies the Docker image to be used for the pool. Refer to Creating your own Agent images for details on how to create custom images.
Schedules
Schedules can be defined in the YAML descriptor too using the same configuration properties as in the Step UI. Note if you need help to define the CRON expression we recommend using the Step UI wizard.
Example:
schedules:
  - name: "Opencart synthetic monitoring schedule"
    #CRON expression for one execution per minute
    cron: "0 0/1 * * * ?"
    planName: "Opencart synthetic monitoring plan"
Notification Presets
Here is a snippet showcasing the definition of Notification Presets:
notificationPresets:
  - EmailNotification:
      presetName: "Sample mail"
      upstreamPreset: "Mail"
      subject:
        data: "${eventSummary}"
        protection: READONLY
  - WebhookNotification:
      presetName: "Sample Webhook call"
      upstreamPreset: "Webhook"
      url:
        data: "https://example.org"
      method:
        data: "POST"
      body:
        data: "{\"Hello\": \"World\"}"
      headers:
        data:
          "X-Step-URL" : "${controllerUrl}"
Alerting rules
Alerting rules can also be defined in YAML as you would do it in the UI. Example:
alertingRules:
  - description: "Send email for incident created for Opencart synthetic monitoring"
    name: "Opencart synthetic monitoring email"
    eventClass: IncidentOpenedEvent
    conditions:
      - BindingCondition:
          bindingKey: "executionParameters"
          predicate:
            BindingExistsPredicate:
              {}
      - BindingCondition:
          bindingKey: "executionParameters[env]"
          predicate:
            BindingValueEqualsPredicate:
              value: "PROD"
    actions:
      - NotificationAction:
          notification:
            EmailNotification:
              upstreamPreset: "Sample Mail"
              from:
                data: "me@example.org"
              to:
                data:
                  - "you@example.org"
                  - "them@example.org"
              bodyPlaintext:
                data: "An incident was opened, technical information: %{bindings}"
Fragment files
The concept of fragment files enables the creation of modular automation packages.
A fragment file declares automation package entities using the same syntax as automation package files and can be included in a main automation package to build packages in a modular way.
Fragment files are referenced in the main automation package file using the fragments field:
version: 1.0.0
name: "My Automation Package"
fragments:
- "fragment1.yml"
- "fragment2.yml"
Each entry of the fragment list can be either the relative path to the referenced fragment or a wildcard expression referencing a list of fragments:
version: 1.0.0
name: "My Automation Package"
fragments:
- "fragments/*.yaml"
Example
Here’s an example of a main automation-package.yaml referencing 2 fragments that each define a plan to be included in the automation package:
version: 1.0.0
name: "My Automation Package"
fragments:
- "plan1.yml"
- "plan2.yml"
The plan1.yml file would only contain the definition of the plan 1:
plans:
  - name: "Plan 1"
    root:
      testCase:
        children:
          - echo:
              text: "Hello world 1"
Setup your IDE for auto-completion and validation
The JSON schema can be downloaded from your Step instance by going to the Automation Package view and accessing the help menu. The underlying REST service can also be used directly for integration: <Your_Step_instance>/rest/automation-packages/schema
In IntelliJ IDEA add the JSON schema mapping as follows
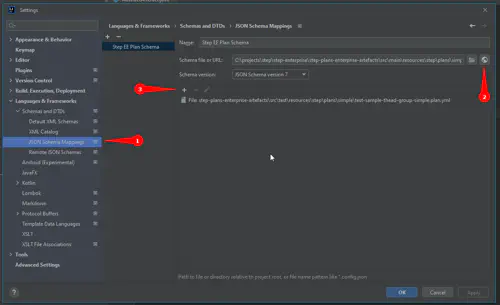
- In IDEA setting open the JSON Schema Mappings in Languages & Frameworks section.
- Find and select the downloaded JSON Schema from your Step instance (Automation Package Schemas are currently not publicly available on schemastore.org )
- Choose the files you want to link with the selected JSON Schema
After that you can use the chosen schema in the embedded YAML editor:
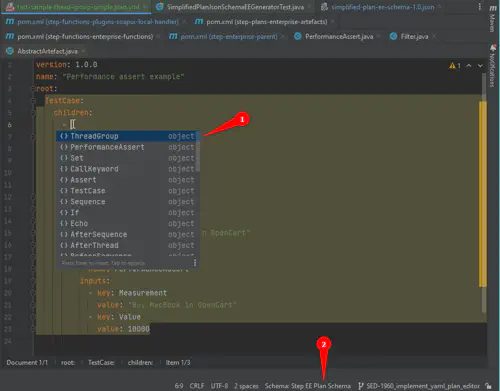
- When you type something in the YAML editor linked with JSON Schema, IDEA shows the on-the-fly suggestions and validates entered data according to the selected JSON Schema
- For the current file you can change the link to the JSON Schema (switch schema from OS version to EE or update schema to the latest version)