Keywords calls
Keywords serve as the fundamental building blocks for implementing automation. From a business perspective, a Keyword symbolizes a functionality to be automated. It might represent a fully automated flow or be as simple as a single user action or service call. A Plan represents an automated scenario and will normally consist of one or more Keywords. Whenever a Keyword is encountered during Plan execution, it leads to a Keyword call. This section focuses on the usage of Keywords within a Plan.
How to call a Keyword from a Plan
One of the ways you can add a Keyword to a Plan is through the visual editor. From the Plan visual editor, under the Keywords tab, you can select and add Keywords to a Plan, as shown in the following screenshot.
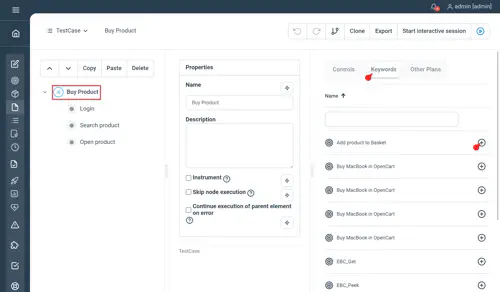
The Keywords tab provides a comprehensive list of all available Keywords. You can search for specific Keywords by using any of the column search fields in the Keyword table.
Advanced Keyword parameter selection
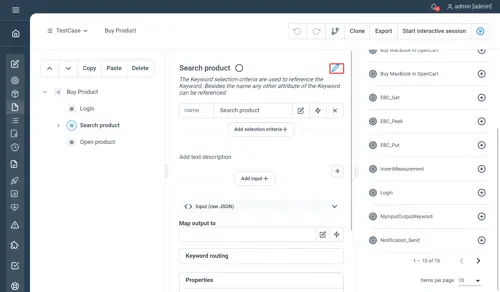
When adding Keyword to a Plan through the visual editor, the Keyword parameter can be adjusted. This typically includes the Keyword name and any custom attributes you have defined, such as application name or version. For more information, refer to the documentation about modifying the screen templates.
To select or adjust your Keyword parameter during Keyword call, click the edit mode next to the Keyword name.
The basic syntax for calling an existing Keyword without input using the plain text syntax is:
Login
Search_product
Open_product
Add_product_to_basket"Log in"
"Search product"
"Open product"
"Add product to basket"Using the PlanParser the syntax is the same as the plain text syntax
Keyword inputs
An important aspect of Step Keywords is the ability to take input data as argument. The data passed to Keywords are the input parameters. You can provide parameters through the Inputs field or as a JSON object.
The following is how you pass data to a Keyword using the visual editor:
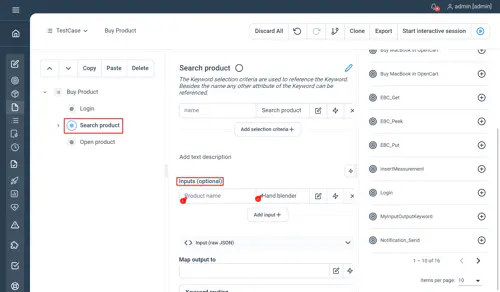
The Toggle dynamic field button lets you activate or deactivate complex expression. Activating the toggle passes the input values as variables or complex expressions. When the toggle is deactivated, the Value field is passed as string without special interpretation. See Variables for more details.
The following is an example of calling an existing Keyword with data input using the plain text:
Login
Search_product product_name="Hand blender"Search_product "product name"="Hand blender" Using the PlanParser the syntax is the same as the plain text syntax
Keyword outputs
An important feature of Step Keywords is their ability to return data after execution, typically used for assertions or for passing information to the next keywords. In simple terms, a keyword output is a map (list of key-value pairs) that you access in your plan using one of the following variables :
- output: available in the scope of the called keyword (see below examples for the visual editor)
- previous: available for sibling controls of the called keyword (see example in the plain text editor)
The values of the output fields can be primitive types (string, number, boolean), array or another map. Simply access given values using the dot notation in your dynamic expression.
//Retrieve a number,boolean or string:
output.myPrimitiveField
//Retrieve a nested field:
output.myNestedField.myPrimitiveField
//Retrieve an element from an array:
output.myArrayField[1]
Note: Before Step 23, output variable were technically a JSON Object - jakarta.json.JsonObject more complex to handle. However in case you need to revert to this type of output for compatibility with older plans, please check the migration notes.
Asserting output
In a Plan, output values returned by a Keyword can be validated using Step built-in Assert control. In this case the use of the output variable is implicit.
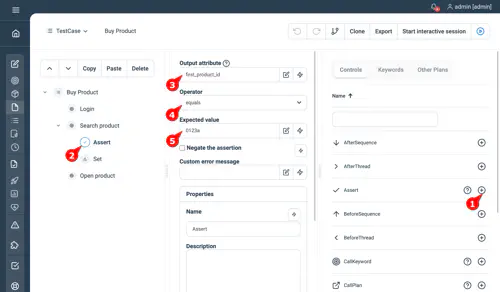
Let’s consider an example where the Keyword Search product retrieves the first_product_id. To verify that the output value matches an expected value, you can utilize the Assert control, as depicted in the following screenshot.
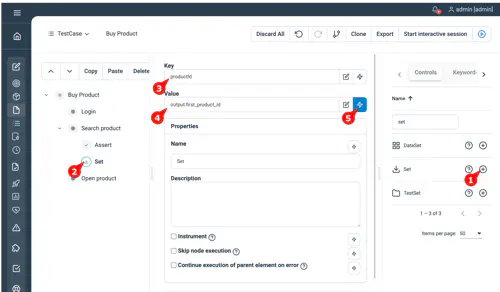
Storing output
If you need to store the value of the output “first_product_id” for later use in the Plan, you can employ the Set control and enable the Toggle dynamic field option, as shown in the following screenshot. By activating the dynamic field button, Step interprets the value provided in the corresponding field as an expression. This enables you to refer to and reuse the variable.
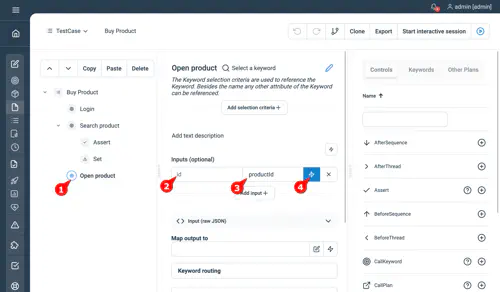
Passing output
To pass the stored value to the input of the Open product Keyword, activate the Toggle dynamic field button, as illustrated in the following screenshot. The Inputs field refers to the stored output value of the Search product Keyword.
The following is an example of calling an existing Keyword with data input using the plain text:
Login
Search_product product_name="Hand blender"
Assert first_product_id = "Trisa"
Open_product id = "${previous.first_product_id}"
The object previous refers to the output of the previous Keyword execution.
Using the PlanParser the syntax is the same as the plain text syntax
Grouping Keywords with Session control
Depending on your automation goals, you can either use a Keyword to represent an entire automation scenario, or you can use simpler Keywords to represent specific actions within the scenario. In some cases, these simple Keywords may rely on preconditions set by other Keywords. These Keywords, known as stateful Keywords, depend on the successful execution of preceding Keywords as prerequisites. When working with stateful Keywords, it is crucial to ensure that all the Keywords within a sequence are executed on the same Agent.
In a regular Plan, Keywords may be distributed randomly across different Agents. However, if you require a specific Keyword sequence to be executed on the same Agent, maintaining the same application context, you need to explicitly instruct Step to enforce it using the *Session control. The Session control ensures that all enclosed Keywords are executed on the same agent token.
.
Use the visual editor to tell Step to group the execution of Keywords on the same agent token, as shown in the following screenshot:
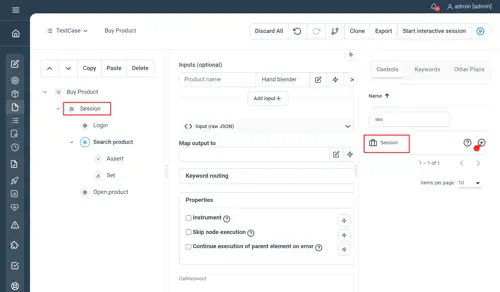
Grouping the Keywords within a Session will ensure that all three Keywords are executed on the same agent token.
The syntax for telling Step to group the execution of Keywords on the same agent token is as follows:
Session
 Login
 Search_product product_name="Hand blender"
 Open_product
End
The syntax will ensure that all the three Keywords are executed on the same agent token.
Using the PlanParser the syntax is the same as the plain text syntax
Keyword routing
Keywords are executed on Step Agents, specifically on Agent tokens. Each Agent emits a configurable number of tokens in the grid, which are then available for executing Keywords. When a Plan reaches a Keyword during execution, a token is selected from the grid to execute that particular Keyword on the Agent. This process of selecting a Token for Keyword execution is known as Token selection.
Token selection
Each Agent token can have a list of key-value pairs known as agent token attributes. These attributes can be used during Token selection. The configuration for agent token attributes is done in the Agent Configuration.
Token selection works like querying a set of objects. On one side, you have the set of agent tokens with their token attributes (key-value pairs), and on the other side, you have the selection criteria configured in the Keyword routing.
The selection criteria, also known as Keyword routing, can be defined in multiple places in Step, providing users with maximum flexibility to determine on which agent tokens the Keywords should be executed. The following are the different places where keyword routing can be defined.
- In the Plan, specifically on the Keyword node: This lets you define call-specific routing criteria that are specific to a particular Keyword call in a specific Plan.
- In the Plan, on the Session node: This enables you to define Session-specific routing criteria that are specific to a group of Keywords (Session) in a specific Plan.
- In the Keyword configuration window: This allows you to define specific routing criteria for a particular Keyword.
- Centrally, using the special variable route_to_: This provides a way to centrally define routing criteria.
By utilizing these options, you can control how Keywords are routed and executed on specific agent tokens based on your automation requirements.
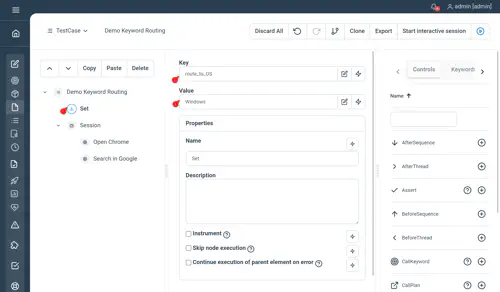
Defining Keyword routing in the Plan on the Keyword node
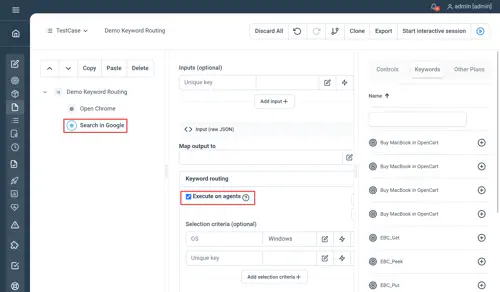
Use the visual editor to define token selection criteria as shown in the following screenshot:
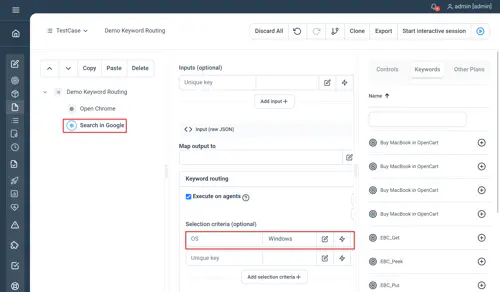
This will select an agent token that has the attribute OS=“Windows” to execute the keyword “Search in Google”.
Please also note that you have the possibility to execute the Keyword directly on the Controller if you uncheck the Execute on agents checkbox. If you choose to do so, the token selection criteria will be ignored.
Currently the plain text syntax doesn’t support the specification of selection criteria at Keyword call level
Using the PlanParser the syntax is the same as the plain text syntax
Defining Keyword routing on the Session node
Use the visual editor to define token selection criteria as shown in the following screenshot:
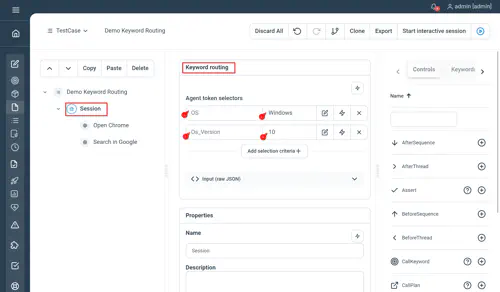
This will select an agent token that has the attribute OS="Windows" and OS_Version=“10” to execute both Keywords grouped by the Session control.
Session OS="Windows" OS_Version="10"
 Login
 Search_product product_name="Hand blender"
 Open_product
EndUsing the PlanParser the syntax is the same as the plain text syntax
Defining Keyword routing in the Edit Keyword dialog
You can define token selection criteria per Keyword on the Edit Keyword screen as follows.
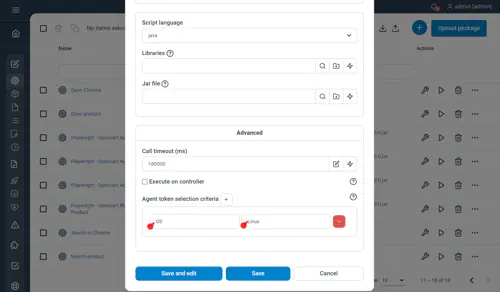
This will add the selection criteria OS=“Linux” for the execution of the keyword Open Chrome in all Plans.
Defining Keyword routing using the special variable route_to_
You can use the reserved variable route_to_{key} in order to define additional selection criteria either in your Plan or centrally under Parameters. For instance, if you want to add the selection criteria OS = Linux centrally for all the token selections, you can define the Parameter route_to_OS = Linux
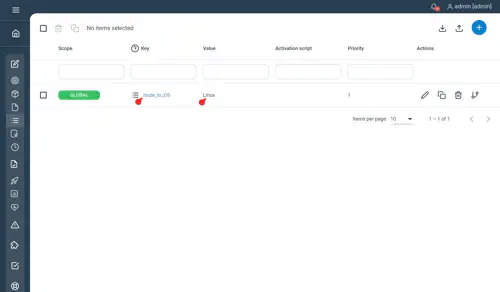
As route_to_{key} is handled like any other normal variable, you could also declare it in a Plan:
This would add the selection criteria to all the nodes that are in the scope of the variable.
Token selection order of precedence
When defining token selection criteria in Step, it is important to understand how multiple criteria are handled. If there are multiple selection criteria defined for the same token attribute at different locations, the following rules determine the precedence (from highest to lowest priority):
- Selection criteria defined by the special variable route_to_
- Selection criteria defined in the Keyword configuration window
- Selection criteria defined on the Session node
- Selection criteria defined on the Keyword call node
Compilation of different selection criteria
When defining different selection criteria for different token attributes, the query used to select the agent token for Keyword execution is built as follows: All the selection criteria are concatenated in a query using a AND logic operator.
For example:
- You have defined the selection criteria OS=“Windows” on the configuration screen of the Keyword Open IE.
- You have defined an additional selection criteria Windows_Version=“10” on the Session node of your Plan.
At the time of Keyword execution, Step will search for an agent token that has both the agent token attributes OS=“Windows” and Windows_Version=“10”.
By understanding the precedence of selection criteria and how they are compiled, you can effectively control the token selection process and ensure that Keywords are executed on the desired agent tokens based on specific criteria.