ALM
The Micro Focus ALM integration plugin provides an out-of-the-box integration of Step with ALM.
With the ALM integration plugin you create, design and manage your automated test cases in ALM, run them on step’s Execution Engine, and evaluate the run results and test reports at the same place in ALM. This plugins is therefore the perfect solution for users requiring the best of the 2 worlds: the unique power of the Step Execution Engine with the test management and reporting features of ALM.
The test case design relies on the standard plain text syntax of STEP (The same as used by the other integration plugins like Azure DevOps and Jira).
Plugin Usage
Step name
The field “Step Name” of the ALM Test Plan is used to described your steps. It is used in both the test execution reports in Step and in the Test Runs reports in ALM. It is therefore a good practice to use short and expressive step names.
Description field
The field “Description” of the ALM Test Plan is used to specify the flow of your Test Plan. For the simplest Test Plans it is a simple sequence of keywords with key-values as parameters. More complex Test Plans make use of the Step Controls in Plain text syntax and are documented here.
You could for example, call the keyword “Keyword1” with 2 parameters using below syntax :
| Step Name | Description | Expected Result |
|---|---|---|
| Step 1 | Keyword1 Parameter1 = “Value1” Parameter2 = “Value2” |
TestCase Example
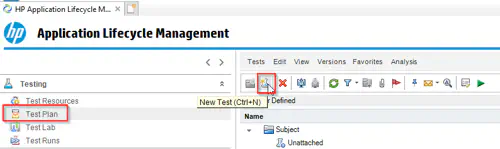
To create a simple test case, open ALM and navigate to the Test Plan view then click on the “New Test” icon :
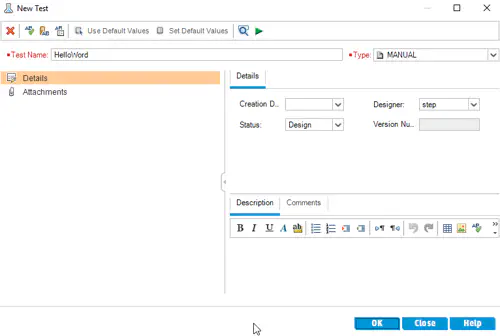
Give your plan a name then click to the “OK” button :
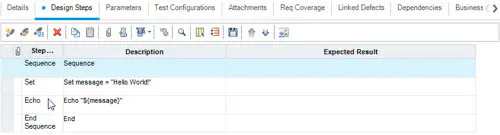
You can now add some execution steps to your test using the right panel. Let’s create a simple test which contains a sequence with a variable assignment and an echo :
Once you have checked-in your new test, click on the execution button : it will be executed in Step as a test case (default behavior) :
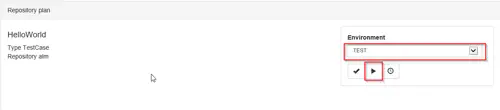
Choose the desired environment where to execute the test than click on execute :
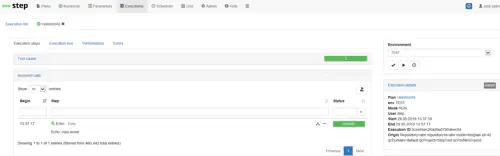
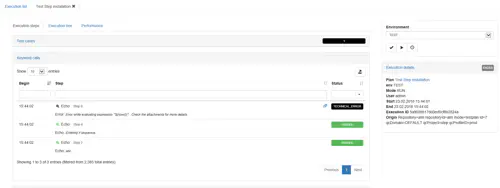
You are directed to the Step execution screen where you can view your test plan results :
TestSet Example
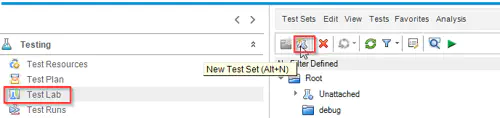
To execute several test in parallel, you can use the TestSet functionality via the ALM Test Lab. For this, navigate to the Test Lab view and click on the “New Test” icon :
Give your test set a name then click to the “OK” button :

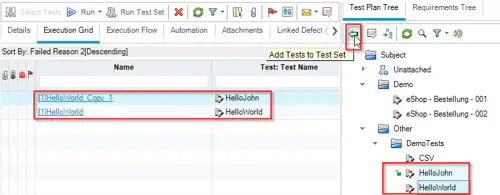
You can now add some test plans to your test set using the right panel. Select the test plans you want to add then click on the “Add Tests to Test Set” button :
Once you have checked-in your new test set, click on the execution button : it will be executed in Step as a test set (default behaviour) :
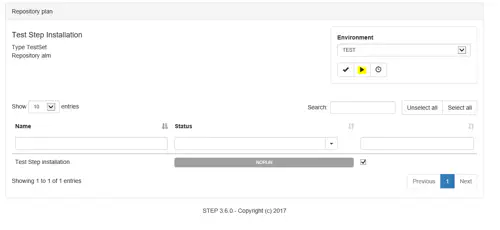
Choose the desired environment where to execute the test set than click on execute :

You are directed to the Step execution screen where you can view your test set results :
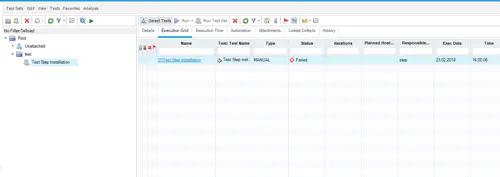
In addition, the test case execution results are reported in ALM : you can view them in the Test Lab after having clicked on your Test Set, under the tab “Execution Grid” :

Expected Result field
The Expected Result field can be used to express checks after a Keyword execution.
The syntax is the following :
keywordOutputValue operator "expectedValue"Below the field description :
- keywordOutputValue = the name of the output value of the keyword to be checked
- operator = The operator to be used to perform the check. The following operators are supported:
- = : equality check
- ~ : regular expression check
- contains : asserts true if the specified output attribute contains the expected value
- beginsWith : asserts true if the specified output attribute value begins with the expected value
- endsWith : asserts true if the specified output attribute value ends with the expected value
- expectedValue the expected value
Example
| Step Name | Description | Expected Result |
|---|---|---|
| Step 1 | Keyword1 Parameter1 = “Value1” Parameter2 = “Value2” |
OutputParameter1 = “MyExpectedValue” OutputParameter2 beginsWith = “MyExpected” |
Groovy macros
It is possible to define new Groovy macros that can be called in your test description. The related documentation is located here.
Installation
Plugin Setup
ALM-side
The goal of the ALM-side installation is to allow the user to invoke Step from ALM. In order to do that, a custom script has to be created and new buttons added on the TestSet and TestLab screen.
Installation
To configure ALM,
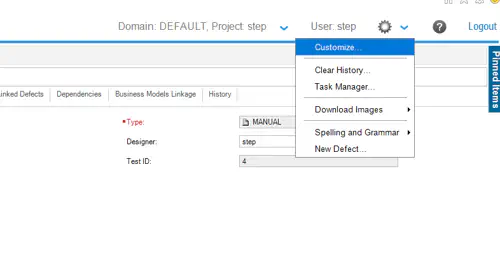
- Go on the “Customize” screen:
- This will open a new screen where you can open the script editor:

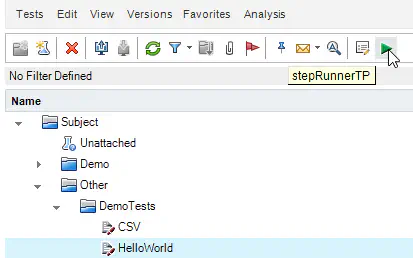
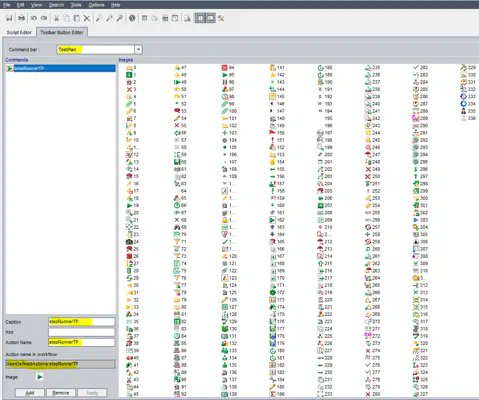
- In the editor, go into the “Toolbar Button Editor” tab and select the “TestPlan” command bar. You will be able from here to create a new command called stepRunnerTP and configured as described bellow:
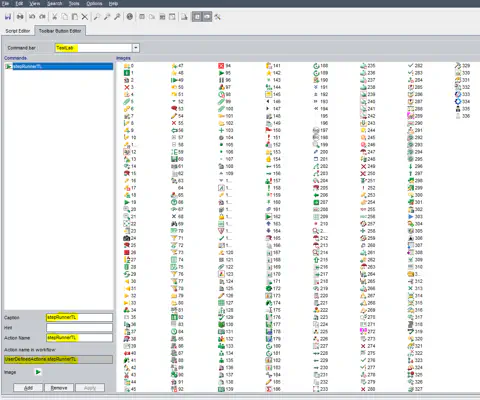
- You can then create in a similar way a new button for the Test Lab:
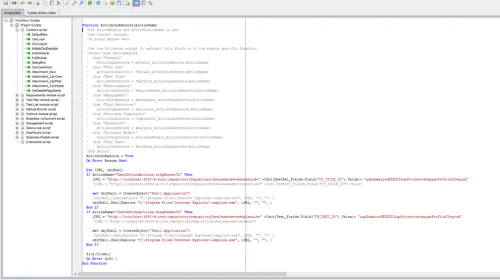
- Finally, go to the “Script” tab and add the following function (code available below):
Please note that the following values have to be adapted depending on your environment:
- <CONTROLLER_URL> should point to the url of your Step controller (localhost:8080 in the previous example)
- <DOMAIN_NAME> and <**PROJECT_NAME>**should be set to the proper Domain/Project (DEFAULT/step in the previous example)
Function ActionCanExecute(ActionName)
  'Use ActiveModule and ActiveDialogName to get
  'the current context.
  'On Error Resume Next

  'Use the following script to redirect this function to the module specific function:
  'Select Case ActiveModule
  '  Case "Defects"
  '    ActionCanExecute = Defects_ActionCanExecute(ActionName)
  '  Case "Test Lab"
  '    ActionCanExecute = TestLab_ActionCanExecute(ActionName)
  '  Case "Test Plan"
  '    ActionCanExecute = TestPlan_ActionCanExecute(ActionName)
  '  Case "Requirements"
  '    ActionCanExecute = Requirements_ActionCanExecute(ActionName)
  '  Case "Management"
  '    ActionCanExecute = Management_ActionCanExecute(ActionName)
  '  Case "Test Resources"
  '    ActionCanExecute = Resources_ActionCanExecute(ActionName)
  '  Case "Business Components"
  '    ActionCanExecute = Components_ActionCanExecute(ActionName)
  '  Case "Dashboard"
  '    ActionCanExecute = Analysis_ActionCanExecute(ActionName)
  '  Case "Business Models"
  '    ActionCanExecute = BusinessModels_ActionCanExecute(ActionName)
  '  Case "Test Runs"
  '    ActionCanExecute = TestRuns_ActionCanExecute(ActionName)
  'End Select
  ActionCanExecute = True
  On Error Resume Next

  Dim iURL, objShell
  If ActionName="UserDefinedActions.stepRunnerTL" Then
     iURL = "http://<CONTROLLER_URL>/#/root/repository?repositoryId=alm&mode=testset&id=" +Cstr(TestSet_Fields.Field("CY_CYCLE_ID").Value)+ "&qcDomain=<DOMAIN_NAME>&qcProject=<PROJECT_NAME>&qcProfileID=prod"

     set objShell = CreateObject("Shell.Application")
     objShell.ShellExecute "C:\Program Files\Internet Explorer\iexplore.exe", iURL, "", "", 1
  End If
  If ActionName="UserDefinedActions.stepRunnerTP" Then
     iURL = "http://<CONTROLLER_URL>/#/root/repository?repositoryId=alm&mode=testplan&id=" +Cstr(Test_Fields.Field("TS_TEST_ID").Value)+ "&qcDomain=<DOMAIN_NAME>&qcProject=<PROJECT_NAME>&qcProfileID=prod"

     set objShell = CreateObject("Shell.Application")
     objShell.ShellExecute "C:\Program Files\Internet Explorer\iexplore.exe", iURL, "", "", 1
  End If

  file.Close()
  On Error GoTo 0
End Function
Controller-side
The second step of the installation is to configure the controller so it will be able to communicate with ALM in order to retrieve the tests from ALM and publish the results of the test runs back into ALM.
Installation
Plugin installation
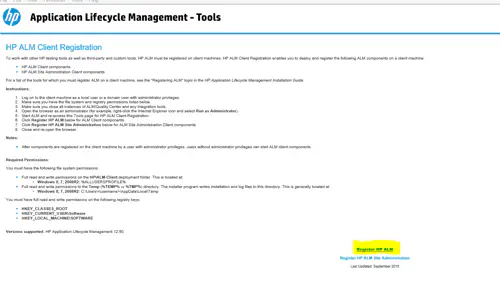
First, you will need to register the ALM DLLs used for accessing the ALM API. You will need admin right on the Controller.
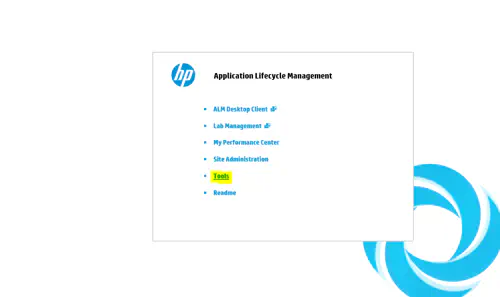
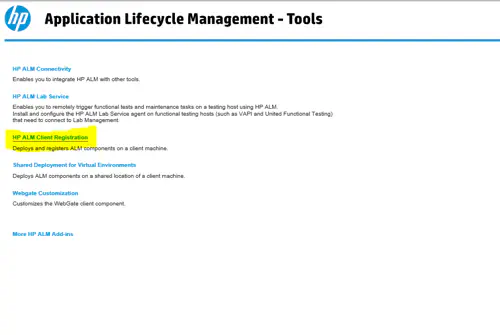
- Open Internet explorer as an administrator and go to ALM, then click on tool:
- Then go to HP ALM Client Registration:
- Finally, click on Register HP ALM to trigger the registration:
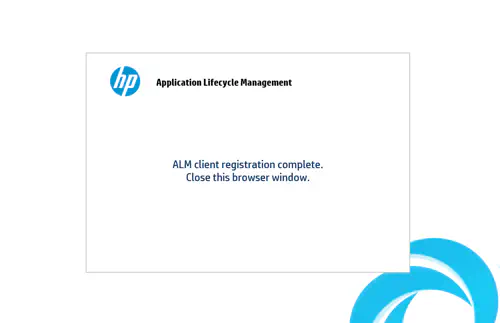
- The following message should appears at the end of the installation:
Adding 64 bit support for ALM connections
The ALM OTA DLLs are only available in 32 bits and can therefore only be integrated with 32 bits processes by default. In case you want to use our ALM daemon with a 64 bit JVM you must apply following workaround. This workaround adds registry entries ensuring that the OTA client dll will be called through a surrogate process.
Download and execute the attached registry script with administrative privilege.
Configuration
Below configuration entries are mandatory and needs to be set to the file …\step-controller-X.Y.Z\conf\step.properties.
almrepository.daemon.javapath=**C:\\Program Files (x86)\\Java\\jre1.8.0_161\\bin\\java.exe**
almrepository.profile.prod.url=http://<**ip>**/qcbin/
almrepository.profile.prod.user=<**user>**
almrepository.profile.prod.pwd=<**password>**The following properties regarding the locales of your ALM installation may need to be adapted. These date formats should match the way dates are displayed in your ALM GUI.
almrepository.reporting.dateFormat=dd.MM.yyyy
almrepository.reporting.timeFormat=HH:mm:ss
Other ALM related configuration entries are documented directly in the step.properties file.
Validation
Installation validation
- Connect on your project and go to the “Test Plan” tab. A new “stepRunnerTP” button should be available
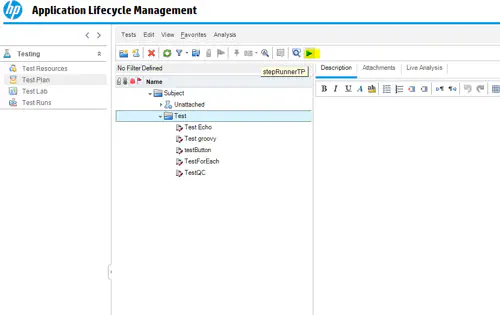
- Create the following demo test, using basic logic blocks that can be used with Step for ALM:

- Select it and click on the new “stepRunnerTP” button. A new Internet Explorer with your Step Controller should popup:
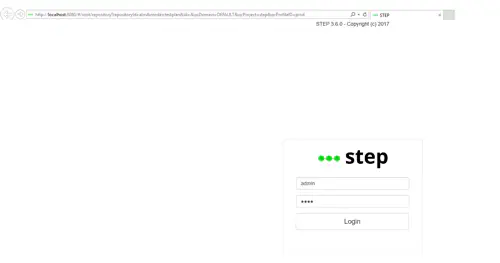
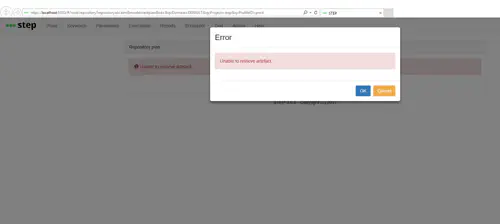
- Log into the controller, you should get the following error. This is normal as the Step Controller has yet to know how to communicate to the ALM instance:
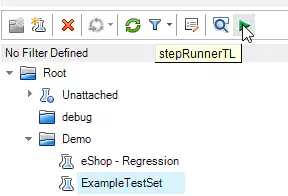
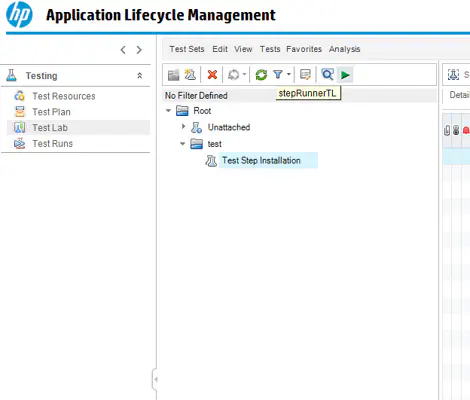
- You can then do the same validation on the “Test Lab” tab. The button will be called stepRunnerTL:
Execution validation
- You can try to execute again from the test lab (so that we can also check the reporting of the execution back to ALM) the small demo test created before:
- Contrary to previously, the controller is now able to query ALM about test information and you should be able to start the execution from the controller GUI:
- You should then be able to see in Step the result of the execution:
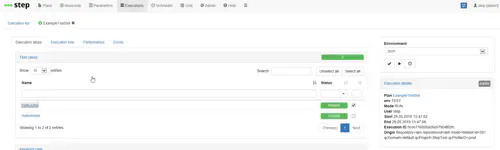
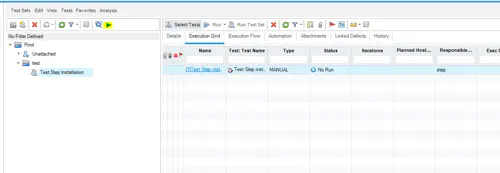
- If you go back to ALM, you should now see the summary of this execution in the “Execution Grid” of the “Test Lab” (a refresh of the view may be needed):
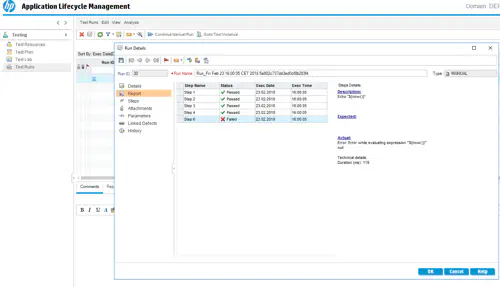
- And also the execution details in the “Test Runs”:
- If the execution is reported as “Not completed”, check if the following exception is present in the controller’s log. If so, check that the formats specified in almrepository.reporting.dateFormat and almrepository.reporting.timeFormat match the date format displayed in ALM
io.denkbar.smb.core.RemoteException: com4j.ComException:80040519 (Unknown error) : Invalid date field value.Controlling reporting to ALM
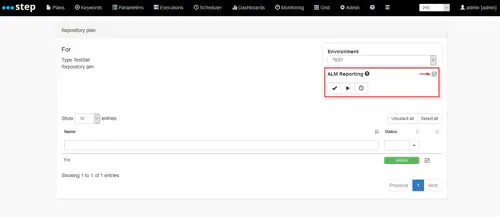
By default, executions of plans which are stored in ALM will be reported back to ALM.
If you want to control this functionality, define an Input with the (exact) ID alm_reporting and type CHECKBOX under Admin - Settings - Screen:
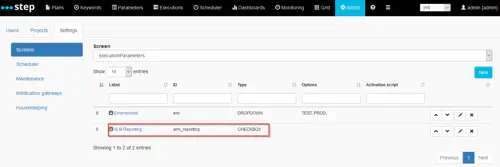
Upon execution of an ALM plan, you will then be able to enable or disable reporting as needed: