.NET agent
.NET Plugin Installation
Installation
Follow this link to install the .NET Step Agent : .NET Agent installation
Keyword Project
.NET Solution
To create new keywords for the .NET agent with Visual Studio Solution, you must first create a new Console Application project in Visual Studio:
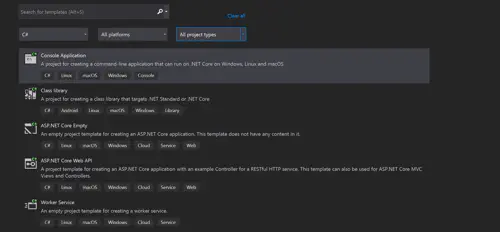
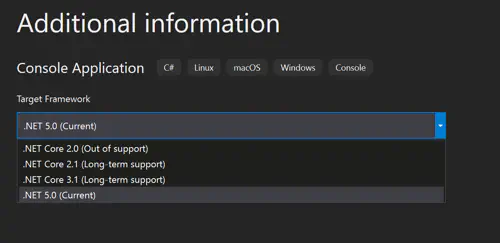
You will then be able to choose between the latest .NET 5.0 framework or the legacy 4.x version (please note that only the latest 4.x version of the framework is tested before the release). The selected version must correspond to the .NET agent distribution that you’re using.
Dependencies
You will need to add the Step dependencies in your projects. The following actions will have to be performed on your new Visual Studio Solution:
- You will first have to add our enterprise nuget repository: https://nexus-enterprise.exense.ch/repository/exense-nuget/ (The user/password for accessing these artifacts will be provided to you with your enterprise license)
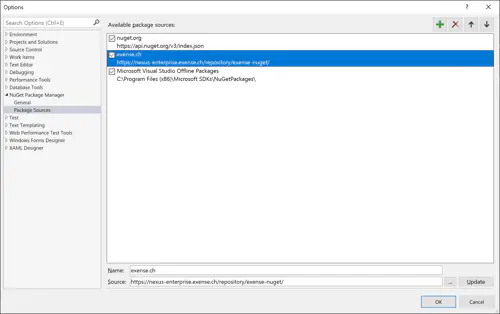
Three components will be available: StepApiKeyword, StepApiFunction and StepApiReporting, containing the core API and a local runner for unit testing your keywords
Deployment
Keyword Package approach
Keyword Packages allow managing Keywords in a batch way. They are the most efficient and practical way to manage Keywords at industrial scale. Please refer to the general keyword documentation.
Note: we are using an external process to discover the keywords contained in a package (DLL), the path to the correct executable must be specified in the step.properties of the controller:
- function_discoverer-5-win64 (default) - for a controller running on windows and packages based on .NET 5.0 framework
- function_discoverer-5-linux64 - for a controller running on Linux and packages based on .NET 5.0 framework
- function_discoverer-5-osx64 - for a controller running on osx and packages based on .NET 5.0 framework
- function_discoverer-4 - legacy version for packages based on .NET 4.x framework (windows only)
Example: plugins.dotnet.discoverer.path=../ext/function_discoverer-5-win64/FunctionDiscoverer.exe
Manual registration approach
Deployment of your keyword library and dependencies can be done by dropping the file(s) into the gui:

Note that:
- The “dependencies libraries” field allows you to add the additional dlls needed by you keyword. It can be a single DLL file or a zip file containing the multiple DLLs
- You can add the .pdb of your keyword DLL in the “dependencies libraries” field, by putting it directly in the filed or by adding it to the zip file
Recommended practices
NUnit
You can unit test your new keywords using the NUnit package. This will save you time as you will be able to debug your keywords without having to build and deploy your DLL to the controller.
To do that, you will first have to install the NUnit nugget dependencies (as described in this section). This will allow you to use [Test] annotated functions.
In order to have the most realistic test, you should use the ScriptRunner object which will simulate the execution of your keywords like Step does. See the following example for more information.
Example
The following .NET class is a simple example of two keywords using the Selenium driver. This demonstrate the usage of the basic API functions:
- First, the new keywords are defined using the [Keyword] annotation
- The getDriver and initDriver functions show the usage of a session. session.get and session.get allows to pass .NET objects during the live cycle of your virtual user. The Webdriver is typical of the usage of the session, as this driver contains the state of the user and have to be unique per virtual user. Note that we are using a wrapper class for the Driver so that the browser will be properly closed
- The gotoGoogle function shows how to pass input values from the test plan to your keywords using input.GetValue
- The testKeywords functions shows how to unit test your keywords using the ScriptRunner object
using System;
using OpenQA.Selenium;
using OpenQA.Selenium.Chrome;
using StepApi;
using NUnit.Framework;
using ScriptDev;

namespace STEP
{
    public class DriverWrapper : Closeable
    {
        private IWebDriver driver;
        public DriverWrapper(IWebDriver driver) => this.driver = driver;
        public void close() => this.driver.Close();
        public IWebDriver getDriver() => this.driver;
    }

    public class TestSeleniumNet : AbstractScript
    {
        protected IWebDriver getDriver()
        {
            return ((DriverWrapper)session.get("chromedriver")).getDriver();
        }
        [Keyword]
        public void initDriver()
        {
            ChromeOptions options = new ChromeOptions();
            string[] optionsList = { "start-maximized", "headless" };
            options.AddArguments(optionsList);
            IWebDriver driver = new ChromeDriver(@"C:\Step\installers\", options, TimeSpan.FromSeconds(30));
            session.put("chromedriver", driver);
        }
        [Keyword]
        public void gotoGoogle()
        {
            IWebDriver driver = getDriver();
            driver.Navigate().GoToUrl("https://google.ch/search?q=" + input.GetValue("search"));
        }
        [Test]
        public void testKeywords()
        {
            ScriptRunner runner = new ScriptRunner(typeof(TestSeleniumNet).Assembly);
            runner.run("initDriver");
            runner.run("gotoGoogle", "{'search':'exense'}");
        }
    }
}
Other API Functionality
Output and Attachments
In order to pass you data into Keywords output as JSON payload or attachment, you can use following code as an example :
Here the keyword class where we add to the output :
- some text via the key / value pair with key “myOutputContent”
- some text that will be available into the attachment file called “myAttachmentContent.txt”
class KW000_SandboxKeyword : AbstractScript
{
    [Keyword]
    public void KW000_SandboxKeywordMethod()
    {
        output.add("myOutputContent", "Here the output content");
        output.addAttachment(AttachmentBuilder.generateAttachmentFromByteArray(System.Text.Encoding.Unicode.GetBytes("[attachmentContent1, attachmentContent2, attachmentContent3"), "myAttachmentContent.txt"));
    }
}
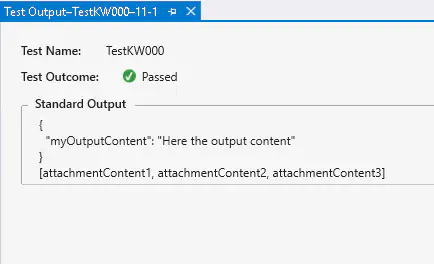
In order to retrieve the output information from your development environment, you can use the following code to call the keyword and display the output :
public void TestKW000()
{
    ScriptRunner runner = new ScriptRunner(typeof(KW000_SandboxKeyword).Assembly);
    OutputMessage output = runner.run("KW000_SandboxKeywordMethod");
    Console.WriteLine(output.payload.ToString());
    Console.WriteLine(System.Text.Encoding.Unicode.GetString(AttachmentBuilder.Base64Decode(output.attachments[0].hexContent)));
}
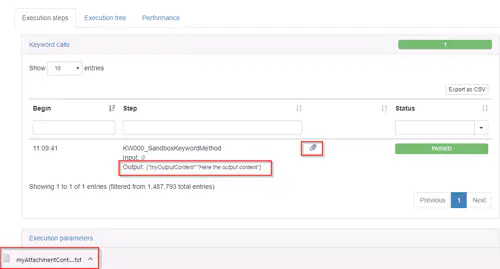
Once you execute this method, the output will be displayed as :
Then once you execute your Keyword within Step, it will display the output message and an attachment file that you can download by clicking on the attachment icon :