Customization
Cosmetics
Customization of step’s static resources (images, stylesheets, …) is made possible in a generic way using the two following properties:
-
cosmetics.folder: This property points to a local folder on the controller’s host in which alternate cosmetic resources are stored (conf/cosmetics/ by default).
-
cosmetics.interceptedResourceList: A comma-separated list of resources which are supposed to be replaces with custom resources. Defaults to step-variables.css.
Using these two properties, step will intercept frontend requests to the resources in cosmetics.interceptedResourceList and redirect them to the corresponding resources in cosmetics.folder.
Simple example
One of the most classical need for a custom theme is to modify the background in order to easily identify different environments.
For example, if you modify the existing step-variables.css as follow:
:root {
  /* Production */
  --main-header-bg-color: #992600;
}
You will then be able to easily distinguish your productive environment:

Complex example
You may want to customize the theme more in detail. Below is a complete example overriding all the step logos of the default style:
First, we need to custom the css even more:
- We override the image on the right side of the login page via background: url(’login_page.png’). This is needed as the name of this image will depend on the codename of the major release you use.
- We also increase the size of the company logo on the login and home pages.
:root {
  /* Production */
  --main-header-bg-color: #992600;
}
.enterprise-theme .step-login-flex-child.step-mountain-background {
  /* Override the login image */
  background: url('login_page.png') no-repeat no-repeat right;
  background-size: cover;
}
.enterprise-theme .step-login-flex-child div.step-login-content div.step-login-logo img {
  /* Increasing the company logo on the login page */
  max-width: 240px;
}
.enterprise-theme #sidebar-logo-and-burgermenu .sidebar-logo {
  /* Increasing the company logo on the home page */
  height: 60px;
}
Then we intercept all the images using the step branding by changing the cosmetics.interceptedResourceList as follow:
cosmetics.interceptedResourceList=step-variables.css,favicon.png,logologin.png,logotopleft.pngWe also change the window title via the ui.title property, so we can easily identify which tab is our productive environment:
ui.title=PROD - Step AutomationFinally, we add the needed png files in the resource folder. These images are:
- favicon.png: This is the website icon
- login_page.png: the main image displayed at the right of the login page
- logologin.png: This is the image displayed at the top of the login form
- logotopleft.png: This is the image displayed to the top left of the main page
Restart the controller and the customization will be in place:
- Login page:

- Home page:
Modifying the Screens Templates
You can customize the fields used by the different Step artifacts in the “Admin -> Settings -> Screens” view:

Usage of screen templates
From the different screen templates available you can achieve the following:
executionParameters
Create an execution Parameter screen. (note: unlike with other screens the ID directly contains the parameter id without prepending “attributes.” as in other screens)

This adds a new input field to the plan execution dialog and allow you to use the new parameter when executing your plan:
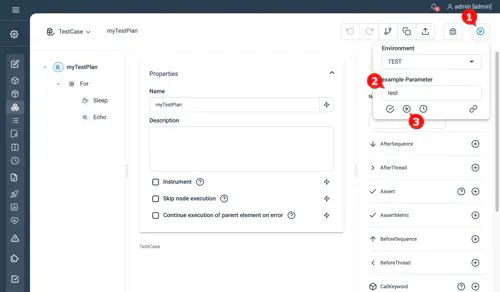
In the execution you will find the parameter here:
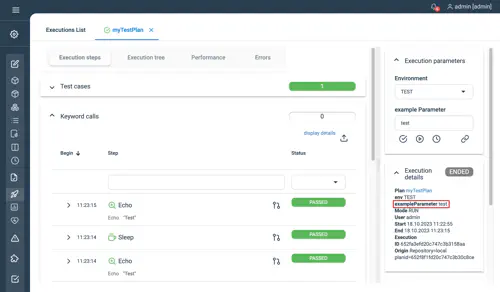
executionTable
Display a parameter that was defined in executionParameters in the execution list, for this the screen ID needs to be prepend with “executionParameters.customParameters.”

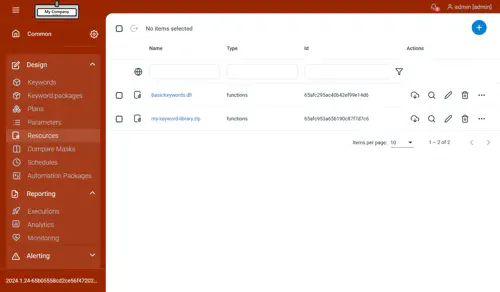
functionTable
Add a new parameter to your keywords and compare masks. It will be useful for example for identifying multiple version of the same keyword:
Example of how to create a functionTable screen:

Example how the keyword list looks like with a custom functionTable screen:

Additional screen tables
Other screen tables work the same as functionTable:
- schedulerTable: Define extra column for scheduler view
- planTable: Define extra column for plans view
- parameterDialog: Define extra value for parameters
- parameterTable: Define extra column for parameters view (note: use same id as in parameterDialog to match the same value)
- functionTableExtension: Same as functionTable but only for the keyword table and not for the compare mask table
Value Cell Renderer
Value Cell Renderer is an advanced property of the screen templates. It allows to enrich a cell with complex elements depending on it’s content. The following renderers are currently available:
- planLink: for planTable: will display the plans name as a link that opens the plan editor
- functionLink: for functionTable: will display the functions name as a link that opens the functions settings
- functionLinkEditor: for functionTable: will display the functions name as a link that opens the functions editor
- functionPackageLink: for functionTable: will display the functions name as a link that opens the functions editor
- schedulerTaskLink: for schedulerTable: will display the schedules name as a link that opens the schedules settings
- parameterLastModification: for parameterTable: renders the lastModificationDate as a date and shows the last modifications user as a tooltip
- parameterKey: for parameterTable: will display the parameter name as a link that opens the parameter settings
- htmlDescription: will render attributes.description as html in the table
Customizing the menu
Starting with Step 21.2 Enterprise Edition, the navigation menu can be customized based on user roles. To enable the customization you’ll need to create a configuration file and reference it in the step.properties.
Menu configuration file
The first section of the file describes the list of menu entries: title, id and icon. The second section describes the menu hierarchy by role. If no hierarchy is defined for a given role, the one defined under ‘default’ is used. Attached file is an example containing the whole menu as default and a reduced menu for the tester role: menu-config.yaml.
Enable the menu customization
In step.properties add following line to reference your configuration file:
ui.menu.config=[path_to_menu_config_yaml_file]Agent Routing and Affinity
Agent token affinity evaluators are used during Keyword routing to determine the best agent token to execute a Keyword on. During Keyword routing all the available agent tokens are iterated over. The role of the affinity evaluator is to give each agent token a score depending on how good each token matches the token selection criteria. The token with the highest score is selected for Keyword execution. A score of -1 means that the token doesn’t match the selection criteria and will not be selected for Keyword execution.
Configuring a custom evaluator
Since 3.11 Step make it possible to use custom affinity evaluators. The default affinity evaluator (TokenWrapperAffinityEvaluatorImpl) should be enough in the majority of cases and you should only need custom affinity evaluators in some special cases. Before trying to use custom affinity evaluators be sure you have a very good understanding of Keyword routing and of the role of affinity evaluators.
Custom affinity evaluators are defined in step.properties with the following property: grid.tokens.affinityevaluator.classname=full.qualified.name.of.the.affinity.evaluator.Class
Affinity evaluators might require specific properties. These custom properties are defined in step.properties with the properties grid.tokens.affinityevaluator.x where x is the name of the custom property.
Default evaluator
The default affinity evaluator works as follows:
- returns the count of the matching token selection criteria (mandatory and optional criteria)
- returns -1 if not all the mandatory token selection criteria are matching
This means that the token matching the highest number of criteria is selected. See class TokenWrapperAffinityEvaluatorImpl for more information.
CapacityAware example
The default affinity evaluator selects tokens independently of other parameters like the current load (token usage) of the agent and thus doesn’t guaranty an even distribution of the load on the different tokens. In some situation we might want to be sure that the load is distributed evenly over the agents. If you have this requirement the CapacityAwareTokenWrapperAffinityEvaluatorImpl would be better suited than the default affinity evaluator.
There are also situations where you need to run more than one agent instance per agent host (for instance 1 java agent and 1 .NET agent). In this case you might want to define the token capacity accross all the agents of a same host. You might for instance want to ensure that not more than one Keyword is executed on the same agent host at the same time. Doing this with the default affinity evaluator isn’t possible. The CapacityAwareTokenWrapperAffinityEvaluatorImpl makes it possible to define a token capacity per agent host (and not per agent instance).
To enable the CapacityAwareTokenWrapperAffinityEvaluatorImpl:
- add the following line to step.properties:
grid.tokens.affinityevaluator.classname=step.grid.tokenpool.affinityevaluator.capacityaware.CapacityAwareTokenWrapperAffinityEvaluatorImpl - create a file with following sample content. this file configures the desired token a capacity per agent host:
{"agents":[ {"hostname":"my-multi-agent-host-1","capacity":1}, {"hostname":"my-multi-agent-host-2","capacity":10} ]} - set the path to the above mentioned file in step.properties:
grid.tokens.affinityevaluator.configuration=/path/to/the/configuration.json
Configuring the CapacityAware evaluator
The configuration file defined by grid.tokens.affinityevaluator.configuration configures the CapacityAwareTokenWrapperAffinityEvaluatorImpl. The configuration file is formatted as json. It defines the maximal token capacity per agent host. The maximal token capacity defines the maximum number of Keyword executions for a specific agent host. To define the token capacity of an agent host, add the following entry to the array “agents” of the configuration file: {“hostname”:“my-multi-agent-host-XYZ”,“capacity”:1},
The hostname should be equals to the hostname of the agent displayed in the grid view in the URL column. If for instance the URL of one of the agents of the agent host displays:
http://my-agent-01.my.net:50056my-agent-01.my.netA capacity of -1 means unlimited.
If a host isn’t specified in this configuration file the capacity is unlimited per default.
The configuration file reloaded automatically on every change. A restart of the controller is therefore not required to take the changes into account.
Custom groovy macros
Installation
In order to use Groovy macros, three steps have to be done:
- First, you have to create a folder on the controller. This folder will contain the Groovy file defining your macros.
- The startup script should be modified by adding the new folder in the class path:
“%JAVA_PATH%java.exe” %JAVA_OPTS% -cp “..\lib*;..\templates” step.controller.ControllerServer -config=../conf/step.properties - A new line has to be added in the step.properties file. This option will allow you to specify the name of the Groovy class containing your marcos:
tec.expressions.scriptbaseclass=Templates
When these changes are done, you can then create your macros file in the new folder.
Note that:
- The controller has to be restarted each time you modify these options or the macro file
- The base name of macro file should have the same name used in tec.expressions.scriptbaseclass and have the .groovy extension (…\step-controller-X.Y.Z\templates\Templates.groovy in our example)
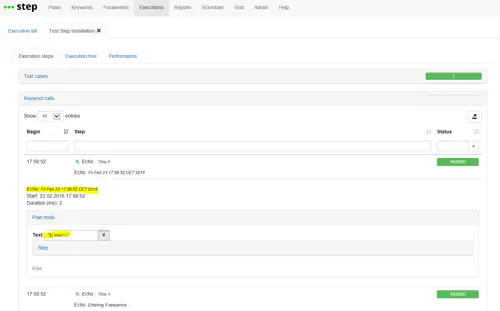
Validation
- In order to validate our groovy macro, we will download the following file and save it under …\step-controller-X.Y.Z\templates\Templates.groovy: Template.groovy
- You should now restart your controller for the new macro to be taken into account
- You can now re-run the example test case. The function now() should be known and return the current date:
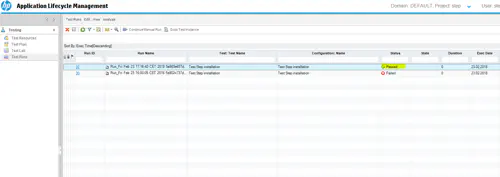
- As a final check, you can also ensure that the new test status is properly reflected in ALM:
Troubleshooting
The following exceptions can be faced when using Groovy Macros:
- Script1.groovy: 1: unable to resolve class WrongTemplate:
- The name in tec.expressions.scriptbaseclass didn’t match the name of your Groovy class
- The name of the folder didn’t match the name in the Java path
- groovy.lang.MissingMethodException: No signature of method: Script1.unknownMethod():
- The method name is misspelled
- Or our didn’t restart your controller after defining the new macros
Password strength policies
Starting with version 3.18, it is possible to define a number of policies that user passwords must adhere to.
Note that by default, no policies are active. The following policies can be defined:
Minimum password length
The minimum required password length can be specified as shown below.
security.password.minimumLength=4
Require character classes
To require that (at least one) upper case (A-Z), lower case (a-z), or numeric (0-9) character must be present, use these configuration options:
security.password.requireUpperCase=true
security.password.requireLowerCase=true
security.password.requireNumeric=true
Require special characters
If you want to enforce that (at least one) special character is present in the password, provide a list of the special characters to be checked, for example:
security.password.requireSpecialCharacter=!@#$%&*
Controlling Messaging Recipients
Version 22 of Step introduced a new notification mechanism which allows the system to send messages to users. Currently, this is used for license-related events.
Starting with Step 22.1, it is possible to specify the audience for messages, i.e., which messages should be delivered to which users. Each message has an associated category and optional subcategory, while audiences consist of a (comma-separated) list of roles.
Here is an example configuration excerpt:
messaging.audience.licensing.licenseUsage = admin, manager
This defines that any message in the licensing category and licenseUsage subcategory
will be dispatched to all users that have a primary role of admin or manager.
Configuration properties
Here is the list of supported configuration properties:
messaging.audience: default audience. If not specified, implicitly uses the defaultadmin.messaging.audience.licensing: default audience for all licensing eventsmessaging.audience.licensing.licenses: messages related to licenses themselves, e.g. new licenses available, license expiry events etc.messaging.audience.licensing.licenseUsage: messages related to license usage, in particular license violations.messaging.audience.licensing.licensingError: messages related to unexpected licensing exceptions.
Behavior
Conceptually, the configuration keys are evaluated in a hierarchical way, bottom-up.
That is, to determine the audience for a particular message with category x and subcategory y:
- If
messaging.audience.x.yis defined, its content will be used. - Otherwise, if
messaging.audience.xis defined, its content will be used. - Otherwise, if
messaging.audienceis defined, its content will be used. - Otherwise, the built-in fallback
adminis used as the role to receive messages.
Notes:
- The system does not perform validation of the role names specified. It is possible to provide invalid role names – they will just not match any user.
- If a specific configuration key is present, but contains no value at all, or only invalid role names, messages which are affected by this configuration key will simply not be delivered to anybody.