Node.js agent
Agent Setup
Installation
Follow this link to install the NodeJS Step Agent : NodeJS Agent installation
Validation
You can now test the installation by first running the following command in a shell:
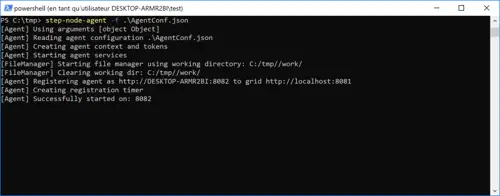
You can also check on the controller that a new agent of type “node” appears:

Troubleshooting
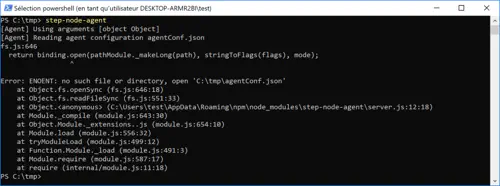
- If you forget to pass the configuration file, the following error will be displayed:
- If you have the following error:
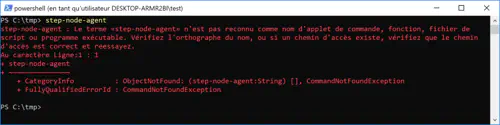
This can mean that:
- The agent was installed with a different user
- The Path environment variable of the user is not correct
- You didn’t restart the shell since the installation
Restart your shell and start again. If this is still not working, check the Path environment. It should contain the folder** C:\Users<UserName>\AppData\Roaming\npm** and this folder should contain the step-node-agent command
Controller
Validation
Your node.js installation should be up and running now. You can test it by copying the following example into your …/keywords/keywords.js file:
exports.Test_Keyword = async (input, output, session) => {
  output.send({ result:input.parameter})
}
This small example will return as an output the value of an input parameter named “parameter”. You can quickly run this example as follow:
Create the keyword, the name should match the name of the function:

The node project parameter is a folder containing your keywords and the npm dependencies needed to run them. This folder has to comply with the following:
- The folder should be on the controller machine (the agent will download them automatically)
- It must contain a file …/keywords/keywords.js defining your keywords
Then click on the “run keyword” button:

Add the parameter and click on “execute this plan”:

The result should be the following:

Troubleshooting
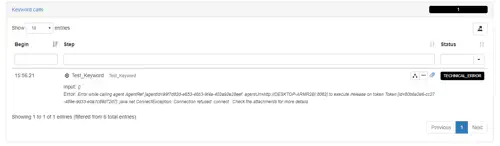
- If you see the following error message:
Go in the grid view and check that you node agent is properly connected to the controller.

If you cannot see your agent:
- Check you** AgentConf.json** for a misconfigured agentPort or agentUrl
- Check that the network connection between the agent and the controller is open
Example
The node agent comes with a more complex example, showing how to create and test Selenium based keywords. You can get the source code on our git repository:
$ git clone https://github.com/exense/step-node.git
$ cd step-node\examples\my-keyword-library
You will then need to:
- Include the ChromeDriver location in your PATH environment variable
- Or drop the chrome driver in the **my-keyword-library **folder
You can finally install the dependencies and run a local test:
$ npm install
$ npm run test
Keyword Unit Testing
The file index.js at the root of the folder gives you an example of how to unit test your keywords:
const runner = require('step-node-agent').runner()
const assert = require('assert')

;(async () => {
  var output = await runner.run('Open_Chrome', {})
  assert.equal(output.payload.result, 'OK')
  output = await runner.run('Google_Search', { search: 'djigger' })
  assert.equal(output.payload.result, 'OK')
  await runner.run('Google_Search', { search: 'exense step' })
  assert.equal(output.payload.result, 'OK')
})()
The keywords.js file contains the logic needed for managing a session and keeping track of the driver between keywords execution:
exports.Open_Chrome = async (input, output, session) => {
  const webdriver = require('selenium-webdriver')

  const driver = await new webdriver.Builder()
    .forBrowser('chrome')
    .build()

session.driver_wrapper = { 'driver': driver, 'close': function() {
      console.log('[Driver wrapper] Closing selenium driver')
      this.driver.quit()
  } }

    output.send({ result: 'OK' })
}

exports.Google_Search = async (input, output, session, properties) => {
  var googleUrl = properties['google.url'];

  const webdriver = require('selenium-webdriver')
  const { By } = webdriver
  const driver = session.driver_wrapper.driver

  session.driver_wrapper.driver = driver
  await driver.get(googleUrl)
  await driver.findElement(By.name('q')).sendKeys(input.search + webdriver.Key.ENTER)

  const data = await driver.takeScreenshot()

    -   output.attach({ name: 'screenshot.png', hexContent: data })
          output.send({ result: 'OK' })
        }

  exports.Close_Chrome = async (input, output, session) => {
  const driver = session.driver_wrapper.driver
  driver.quit()

  output.send({ result: 'OK' })
}

exports.onError = async (exception, input, output, session, properties) => {

    if (session.driver_wrapper) {
        const data = await session.driver_wrapper.driver.takeScreenshot()
        output.attach({ name: 'screenshot_onError.png', hexContent: data })
    }

    return true
}
Keyword Execution
You can now create the new keywords on the controller side and execute Selenium tests from the controller:

Special purpose functions
You can notice in the example two helper callback function:
- exports.onError: This is a specific function allowing to manage the exception handling of your keywords. This function will be called each time on of your keyword execution throws an exception. The return value of this function will determine the status of the execution:
- if true, the keyword execution will be reported as TECHNICAL_ERROR
- if false, the exception is ignored and the keyword will be reported as PASSED
- session.driver_wrapper.close:This is a callback function that will be called when your test execution end. This allows to free all the resources used by our Selenium driver even if the test is aborted. The logic of that mechanism is that all the objects in the **session **are scanned for a **close **function each time a test is finished.