PDF and Image compare
Key features
Step’s PDF and Image comparison plugins allows user to respectively validate the exactness of a rendered PDF or image file (called actual) when compared against a model (called expected document).
As the PDF default comparison is an image-based comparison of every page of the actual document against that of the expected document, and as image types with multiple pages (such as tiff) are supported, both plugins works in a very similar manner. One of the key features of these plugins is the ability for users to define conditions (currently called Anchors) upon which parts of the document (called Excludes) will be ignored during comparisons. This mechanism allows users to focus their tests on the important area of the document and to ignore areas which may vary for reasons which are not relevant to the test strategy.
Another important point of focus for PDF document is the ability to extract text strings and match them against other pre-defined expected strings, allowing users to not base their test cases solely on image comparisons but also on the thorough inspection of the business information which is actually contained within the documents. While this is less relevant in case of images, an optional and beta OCR feature has been made available and could be enabled.
As you can see on the screenshot below, the PDF and Image Comparison plugins come with a comprehensive design environment which is directly embedded into Step’s web application. Drag-and-drop functionality allows for highly intuitive interactions with the document and the effortless selection of excluded zones.

Main use cases
Two standard use cases will be described in this section. For further information, check out the following document which contains diagrams covering additional comparison use cases: Comparison Plugins Diagrams.
Basic comparison use case
A basic comparison scenario is a scenario in which two files simply need to be compared to each other. Each page of the actual file will be matched against the corresponding page of the expected file based on page numbers.
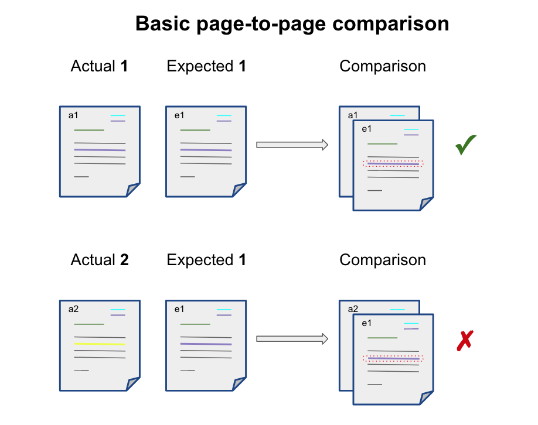
Running a simple web-based test
Here’s how to create a basic comparison test from Step’s web application.
First, go to the “Document Compare Masks” view and create a new Mask of type “PDF Test”. Likewise, for image comparison, select the type “Image compare”.

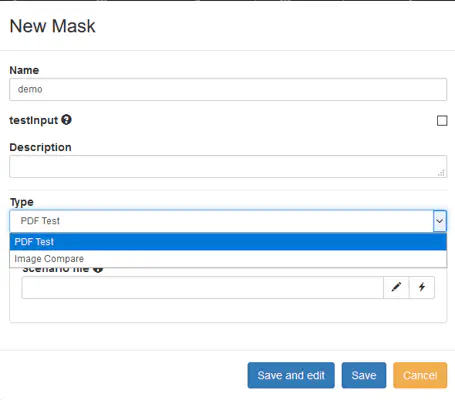
Click the “Save and edit” button in order to land directly in your PDF Test lab.
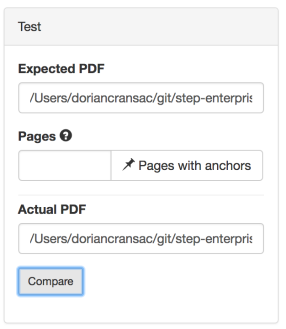
Scroll down until you see the Test box and enter the paths to your actual and expected documents. For the sake of testing, we can use the same document as both the actual and expected to make sure the comparison is successful (since we know we are using an actual document that is identical to the expected).
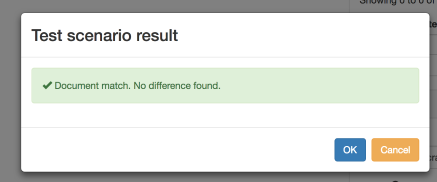
As a result of the comparison, a success result text box pops up.
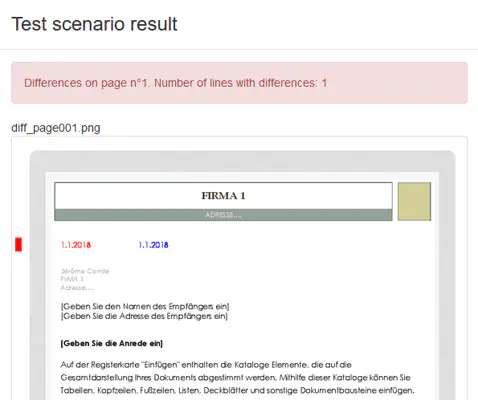
Using documents which don’t exactly match would result in a different outcome. In this case, “diff” information is provided in order to help the user figure out why and where the documents differ. A different number of pages as well as differences within two compared pages will be reported using respectively messages and colors in a red/blue “diff’ed” image result:
Automatic headless execution
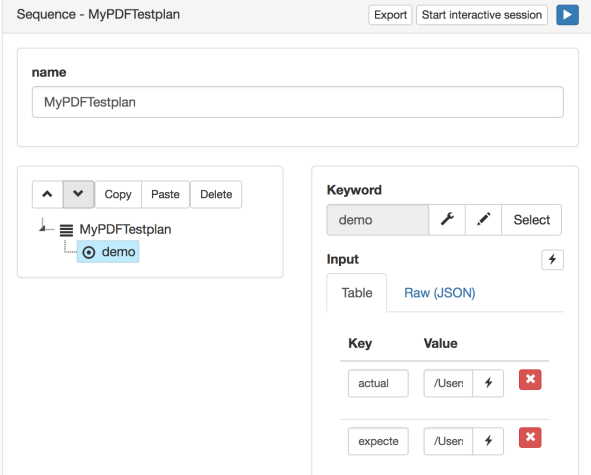
The same can be done by invoking this newly created keyword from a plan and passing the actual and expected paths as inputs.
Here’s how a very simple test plan would look:
And what the result of the execution is, assuming the actual and expected documents successfully match:

In the event of an unsuccessful comparison (i.e when the actual differs from the expected) error messages will be returned as an output and the diff information will be provided in the form of attachments (attached images):

Mask-based use cases
Important concepts
Conditional exclusion concept
As mentioned above in the section Key Features, one of the strength of Step’s PDF and Image Comparison plugins is the ability to define a series of conditions to focus test cases on specific patterns (for instance, page numbers) and areas of the document. Anchors and Excludes are two features which make this possible. The combination of one or more Anchor with one or more Excludes is called a Mask.
Excludes 
Excludes are rectangular zones within a page area which are supposed to be ignored during comparison. This is especially useful when documents contain dynamic data such as document identifiers, which will cause for documents to never match a model exactly, that is, unless the area containing this dynamic data is excluded from comparison.
Anchors 
Anchors serve a conditional purpose: they are used to decide whether or not Excludes have to be applied.
Currently 3 different anchor types are supported:
- Page number based: when selecting this anchor type, at execution time the Excludes defined in the mask will only apply to pages having the same page number as the page where these Excludes are defined. In this case the page number serve as Anchor. For instance: if a set of Excludes is defined on page 2, these Excludes will only apply to the page 2 of the actual document.
- Applies to all pages: when selecting this anchor type, all the Excludes defined in the mask will apply to all pages independently of page content and page numbers. This can be useful to exclude an header that appears on every page. In this case the Anchor is a kind of wildcard.
- Image based: this is an advanced anchor type. In connection with this anchor type users can select specific rectangular areas called Anchors that use image patterns to define whether or not Excludes have to be applied, independently of the page number. This can be very useful to create modular Exclude-sets for a specific document page type which can occur on different pages:
- If Anchors are defined on a specific page of the mask, at execution time the corresponding Excludes (the Excludes defined on the same page of the mask) will only apply to a page if the Anchors are found within that page.
- If no Anchor is defined on a specific page of the mask, the entire page of the mask will be used as Anchor. At execution time the corresponding Excludes will only apply to a page if that page has exactly the same layout as the page of the mask where these Excludes are defined
- A list of Anchors on a specific page and the corresponding Excludes define an Anchor-Excludes combination. It is possible to define an Anchor-Excludes combination per page. For instance, you could define an Anchor-Excludes combination on page 2 using a list of 2 Anchors and 4 Excludes, and an Anchor-Excludes combination on page 4 with an empty list of Anchors and 2 Excludes thus using the all page 4 as Anchor for the corresponding Excludes on page 4.
Masks
Masks are the container for anchors and excludes. Multiple masks can be passed as an input of the PDF Compare or Image Compare Keywords (as a list).
Text Extraction
The text located within the region of an Exclude can be extracted and made available automatically as Keyword output named after the region itself. As explained in the introduction the OCR feature for images is only provided as an optional beta feature which is disabled by default. OCR feature
Mask design
This section contains instructions regarding the design of masks and manual testing from Step’s GUI.
Creating a new test
The PDF and Image Comparison editors can be accessed from the dedicated view “Document Compare Masks” as already described in section running a simple web-based test. It is also still possible to access them via the creation or edition of a Keyword. This will be subject to changes in the future, as mask and mask-related resources will eventually be completely isolated.
Loading a document
In order to load a document, either provide the path accessible by the controller or drag and drop it into the text box, then click “Load”.

Excludes & Anchors
You can toggle between the Anchor and Exclude views respectively by clicking the pin and scissors icons. New regions will then be automatically added by drawing rectangles directly onto the document.

A drag-and-drop action on the document will automatically create a new region (i.e a Anchor or a Exclude, depending on which view you is currently selected), add it to the list and text found within the drawn rectangle will be extracted.
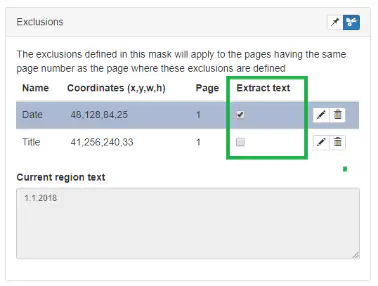
Here’s an example in the case of an Exclude:

You can define if the text content of an exclude region shall be extracted during comparison on the exclude panel. If text extraction is enabled, the content of the region will be extracted and it will be returned as keyword output.
And another in the event of an Anchor creation:

Running a simple web-based test
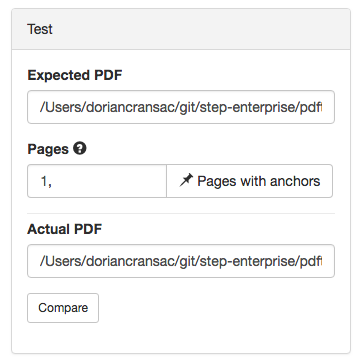
Once you’ve successfully designed a Mask (i.e selected a list of Anchors and Excludes), you can test out your design using the “Test” box. All you need to do is pick a page or pages to be tested against and the actual document from which these pages originate from. Then click the “Compare” button.
Test results
Successful matches (i.e exact comparisons) will display the message “Document match. No difference found.”

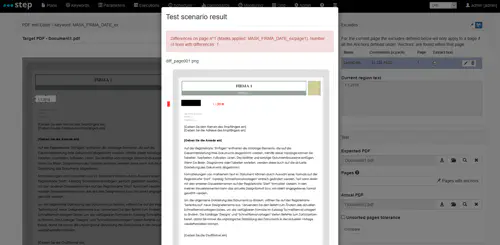
While failed comparisons will display a diff screenshot pattern, providing you with diagnosis information in case the result of the test differs from what you assumed it would be
Automatic headless execution
Mask list
The PDF comparison keyword can take a list of masks as inputs. As previously mentioned, as of right now, keywords themselves contain the masks to be applied during comparison.
This means that the mask list is a series of keywords containing the masks to apply. For instance, assuming I’ve designed two masks inside two keywords named “Mask1” and “Mask2”, I can pass these masks as an input of the PDF_compare in a plan.
It will be a semicolon-separated list:
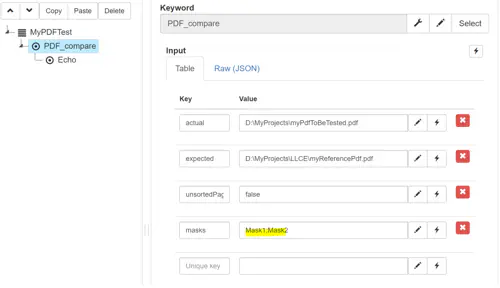
In addition, the page order option can be passed via the box “unsortedPageTolerance”.
Extracted text
If you’ve checked the extraction text box in either an Anchor or an Exclude region’s definition, the corresponding content will be exposed in the PDF_compare output with the name of the region as a key and the extracted text as a value:

As already stated couple of time OCR for the image comparison plugin is only provided as an optional beta feature which is disabled by default. OCR feature
Compare files located on agents
By default the path of the actual and expected files provided as inputs are expected to be accessible from the controller; the files are transferred to the agent during the execution. In cases where the files are only accessible from the agent, the PDF_compare and Image_compare keywords supports the following additional inputs.
- actualFileOnAgent (default false)
- expectedFileOnAgent (default false)
Advanced scenarios summary
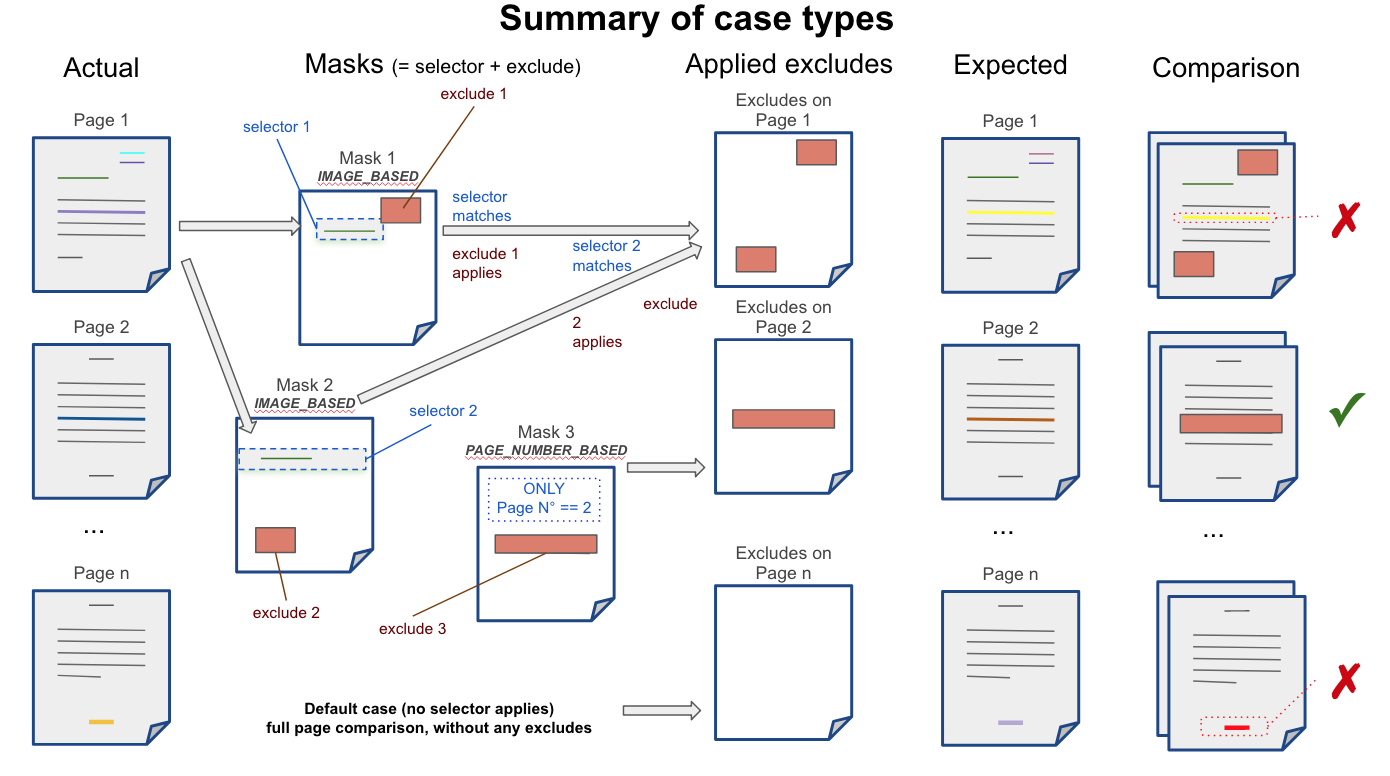
The following diagram taken out of the attached slides summarizes the most advanced comparison use cases:
Plugin installation
Assuming you’re running a properly licensed installation of Step Enterprise Edition, there’s no need to install the plugins themselves, as they come prepackaged as part of the distribution.
PDF Plugin
We currently recommend installing ghost script version 9.22 on your controller and agents. GS is available here for download.
Environment properties
Two properties need to be defined within Step’s configuration file called step.properties and located in the conf folder of the controller:
plugins.pdftest.gsexe=/path/to/ghost/script
plugins.pdftest.scenariodir=/path/to/pdf/folder
In order to scale executions on agents, GS will also have to be installed on each agent host, and the same properties will have to be set within the corresponding AgentConf.json files, under their respective “conf/” folders.
"properties":{
    "plugins.pdftest.gsexe" : "/path/to/ghost/script",
    "plugins.pdftest.scenariodir" : "/path/to/pdf/folder"
    }
Image compare plugin
No additional software installation is required for the image compare plugin at the exception of the OCR feature detailed below.
Environment properties
The following properties can be adapted depending on your needs.
# Define were the image compare masks are store
plugins.compare.image.scenariodir=../data/image_compare/scenari
# Define the height in pixel (margin) used to estimate the number of lines with differences
plugins.compare.lineHeightPx=16
OCR feature
The OCR feature for the image comparison plugin is based on tesseract 4.0. While the functionality is working nicely in many cases, depending on the operating systems and environments it may cause crashes of the controller and agents. Therefore the feature is disabled by default and provided as it (i.e. without support).
Tesseract required libraries are embedded in the controller and agents for Windows but must be installed on other platform. Refer to the official documentation.
The following properties (in step.properties) can be used to enable it and tweak its configuration.
#To enable OCR uncomment following property (unsupported)
# note: some crashes of the controller/agents were observed due to tesseract native libs depending on OS, locals and tesseract versions
#plugins.compare.image.ocr.enabled=true
#change the language used for OCR (by default tessdata integrated to Step covers eng,deu,ita,fra)
plugins.compare.image.lang=deu
plugins.compare.image.supported.lang=eng,deu,ita,fra
#you can define your own tessdata folder with downloaded language from https://tesseract-ocr.github.io/tessdoc/Data-Files.html
#plugins.compare.image.tessdatadir=C:\\path\\tessdata
Special keywords “PDF_Compare” and “Image_Compare”
The keywords PDF_compare and *Image_compare" are generic (i.e reusable) pre-created keywords in the sense that documents can be passed dynamically as expected and actual document inputs. In addition, the list of masks to be applied during comparison is also a dynamic input. This means that the same keyword can be used for all PDF comparisons or respectively image comparisons in your projects.
Note: In the event that one of these pre-created keywords get missing (migration/deletion issue), you can create them using respectively the keyword type PDF Test or Image compare.